Build Your First Shopify App with Shopify CLI 4 and React Router
You've got a Partner account and a dev store. Now let's get an app running inside the Shopify admin. By the end of this post you'll have:
- Shopify CLI 4 installed
- The official React Router app template scaffolded and linked to a new app in the Dev Dashboard
- The app running on your dev store with hot reload
- An understanding of what every file in the project does
- The template updated to the current 2026-07 API version
Series: Shopify App Development 2026, part 3 of 8
Also Read: The Impact of Shopify in E-Commerce Industry
Prerequisites
| Tool | Version | Check with |
|---|---|---|
| Node.js | 22.12 or higher (CLI 4 dropped Node 20) | node -v |
| Git | 2.28.0 or higher | git --version |
| Package manager | npm, Yarn 1.x, pnpm or Bun | npm -v |
| A Partner account and a dev store | See part 2 |
Step 1: Install Shopify CLI 4
npm install -g @shopify/cli@latest

# or with Homebrew on macOS
brew tap shopify/shopify
brew install shopify-cli
Check it worked:
shopify version
# 4.8.2
 All
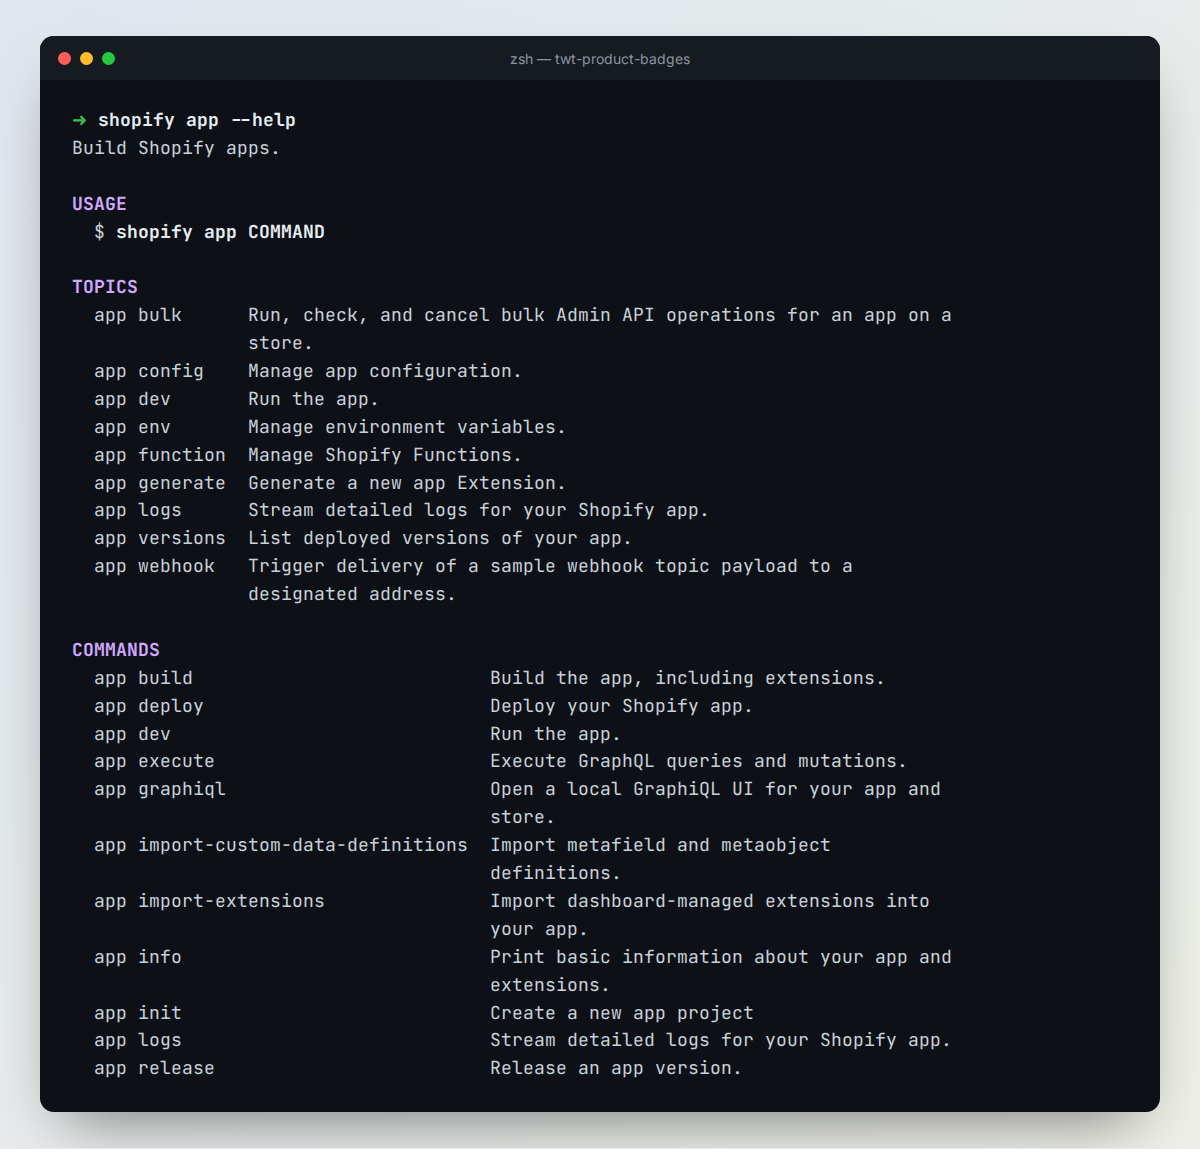
All shopify app commands in CLI 4.8.2.
Also Read: 7 most popular Programming Languages News to learn in 2023 - TWT
What changed in CLI 4?
Shopify CLI 4.0 shipped on May 21, 2026 (changelog). If you're following an older tutorial, these differences matter:
- Semantic versioning. A major version bump now means breaking changes. (3.x bumped the minor version almost every release.)
- Auto-upgrades. The CLI updates itself through your package manager. It won't do this in CI or across major versions. To turn it off:
shopify config autoupgrade off. - Removed commands and flags:
| Old (CLI 3) | New (CLI 4) |
|---|---|
shopify app deploy --force | --allow-updates (and --allow-deletes) |
shopify app generate extension --type | --template |
shopify app generate schema | shopify app function schema |
shopify webhook trigger | shopify app webhook trigger |
--shared-secret | --client-secret |
shopify theme serve | shopify theme dev |
Step 2: Scaffold the app with shopify app init
shopify app init
The CLI asks a few questions:
- Your app's name. We'll use
twt-product-badges. - Get started building your app. Choose Build a React Router app (recommended). The other option, Build an extension-only app, has no backend and only supports custom distribution.
- Language. JavaScript or TypeScript. This series uses TypeScript, the template's default.
- New app or existing app. Choose to create a new app, and pick your organisation if you belong to more than one. The CLI creates the app in your Dev Dashboard and links it to the folder.
The first time you run a command that needs your account, the CLI opens a browser so you can log in.
Non-interactive version (useful for scripts and AI agents):
shopify app init \
  --name twt-product-badges \
  --template reactRouter \
  --flavor typescript \
  --organization-id 1234567
Your organisation ID is in the Dev Dashboard URL: dev.shopify.com/dashboard/<organization-id>.
Remix? Remix merged into React Router 7, and Shopify's Remix template is deprecated. New apps should use React Router. If you have an existing Remix app, follow the official upgrade guide.
Step 3: Run it with shopify app dev
cd twt-product-badges
shopify app dev
The first run does a lot for you:
- Asks which dev store to use. Since CLI 4.8 it can also create one.
- Starts a Cloudflare tunnel so Shopify can reach your local server over HTTPS.
- Updates your app's URLs in the Dev Dashboard to point at the tunnel.
- Runs Prisma migrations for the session database (SQLite).
- Installs the app on your dev store using Shopify managed installation, so there's no OAuth redirect dance.
- Watches your files and hot-reloads.
Press p to open the app in your dev store's admin, or g to open GraphiQL for the Admin API, already authenticated as your app.
Also Read: Programming Guide
Click Generate a product. The app creates a random snowboard product through the GraphQL Admin API and shows a toast. That's the whole round trip working: admin iframe → your server → Shopify API → back to the admin.
Also Read: Programming and JavaScript
Step 4: Understand the project structure
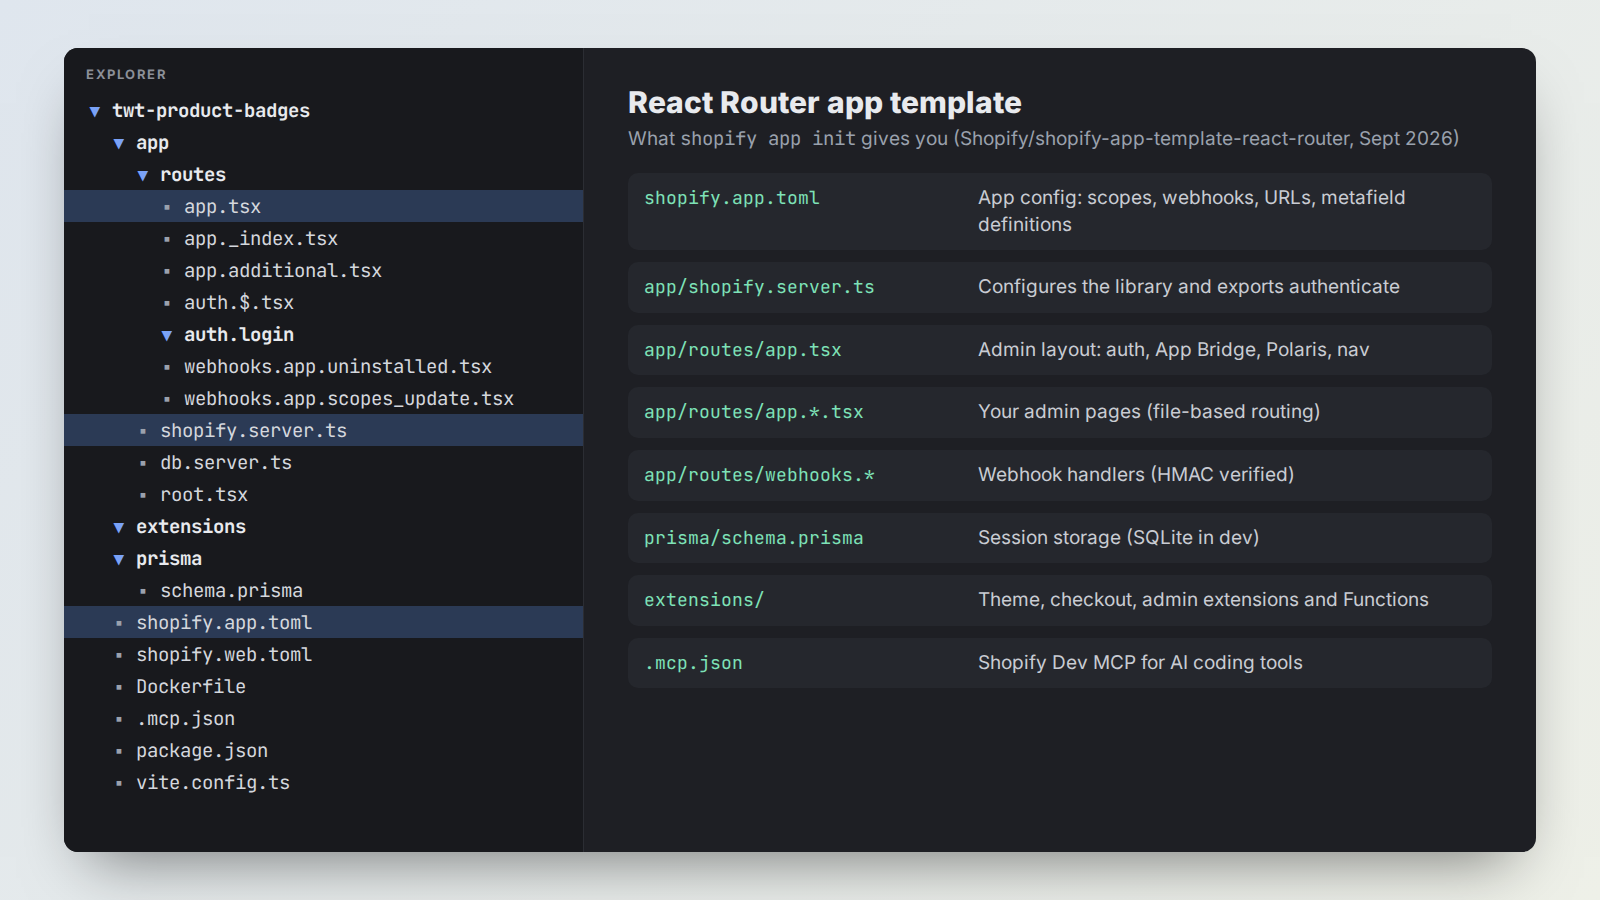
shopify.app.toml: your app's configuration
This file is the source of truth for your app's settings on Shopify: name, URLs, access scopes, webhooks and more. Change it, run shopify app deploy (or keep app dev running in development), and Shopify applies the changes. Because of managed installation, you don't write any OAuth code to request scopes. You declare them here:
client_id = "your-client-id"
name = "twt-product-badges"
handle = "twt-product-badges"
application_url = "https://example.com"
embedded = true

[access_scopes]
scopes = "read_products,write_products"

[webhooks]
api_version = "2026-07"

  [[webhooks.subscriptions]]
  topics = ["app/uninstalled"]
  uri = "/webhooks/app/uninstalled"
You can keep several configs for different environments (for example shopify.app.production.toml) and switch between them with shopify app config use. The full reference is in the app configuration docs.
Also Read: Web Development Guide
app/shopify.server.ts: the Shopify integration
This is where the @shopify/shopify-app-react-router package is configured. It exports authenticate, which you'll call at the top of every loader and action:
const shopify = shopifyApp({
  apiKey: process.env.SHOPIFY_API_KEY,
  apiSecretKey: process.env.SHOPIFY_API_SECRET || "",
  apiVersion: ApiVersion.July26,        // see Step 5
  scopes: process.env.SCOPES?.split(","),
  appUrl: process.env.SHOPIFY_APP_URL || "",
  authPathPrefix: "/auth",
  sessionStorage: new PrismaSessionStorage(prisma),
  distribution: AppDistribution.AppStore,
  future: {
    expiringOfflineAccessTokens: true,  // required for new public apps
  },
});

export const authenticate = shopify.authenticate;
expiringOfflineAccessTokens matters. Public apps created on or after April 1, 2026 must use expiring offline tokens, which last 1 hour and come with a 90-day refresh token. The library refreshes them for you (docs).
Also Read: Difference between full stack developer and web developer
app/routes/: file-based routing
The template uses React Router's flat file routes:
| File | URL | What it does |
|---|---|---|
app.tsx | /app (layout) | Wraps every admin page: authenticates, loads App Bridge and Polaris, renders the nav |
app._index.tsx | /app | The home page, with the "Generate a product" demo |
app.additional.tsx | /app/additional | An example second page |
auth.$.tsx | /auth/* | Auth callbacks, handled by the library |
auth.login/route.tsx | /auth/login | Shop-domain login form, used outside the admin |
webhooks.app.uninstalled.tsx | /webhooks/app/uninstalled | Cleans up sessions when a merchant uninstalls |
webhooks.app.scopes_update.tsx | /webhooks/app/scopes_update | Keeps stored scopes in sync |
_index/route.tsx | / | A public landing page outside Shopify |
The layout route is short but important:
// app/routes/app.tsx
export const loader = async ({ request }: LoaderFunctionArgs) => {
  await authenticate.admin(request);
  return { apiKey: process.env.SHOPIFY_API_KEY || "" };
};

export default function App() {
  const { apiKey } = useLoaderData<typeof loader>();

  return (
    <AppProvider embedded apiKey={apiKey}>
      <s-app-nav>
        <s-link href="/app">Home</s-link>
        <s-link href="/app/additional">Additional page</s-link>
      </s-app-nav>
      <Outlet />
    </AppProvider>
  );
}
authenticate.admin(request) checks the session token (ID token) that App Bridge sends with every request, exchanges it for an access token when needed (token exchange), and gives you an authenticated admin.graphql() client. <AppProvider> injects the App Bridge and Polaris web components scripts. <s-app-nav> renders your app's menu in the Shopify admin sidebar.
Also Read: Statamic Custom Fieldtype Tutorial: PHP Vue 3 & Vite (v6)
Everything else
prisma/schema.prismaandapp/db.server.ts: the session table (SQLite by default). You'll switch to Postgres or MySQL for production in part 7.extensions/: empty for now.shopify app generate extensionputs extensions here (part 5).shopify.web.toml: tells the CLI how to run your web server in development.Dockerfile: ready for container hosts..mcp.json,AGENTS.md,CLAUDE.md: the template comes set up for AI coding assistants, with the Shopify Dev MCP server already configured.
Step 5: Bring the template up to date (important)
When we checked on September 23, 2026, the template on GitHub still targeted Admin API 2025-10 and @shopify/shopify-app-react-router v1. The latest stable API is 2026-07 (with 2026-10 due on October 1), and the library is at v3.0.0. Here's how to update it.
Also Read: JavaScript: How to make
The minimum fix (recommended for everyone): bump the API version in two places.
// app/shopify.server.ts
apiVersion: ApiVersion.July26,
// ...
export const apiVersion = ApiVersion.July26;
# shopify.app.toml
[webhooks]
api_version = "2026-07"
The full upgrade to library v3 (optional). We tested this on a fresh scaffold, and it type-checks and builds:
npm install @shopify/shopify-app-react-router@^3.0.0 \
            @shopify/shopify-app-session-storage-prisma@^11.0.0
Then remove the embedded prop from <AppProvider>, since it no longer exists in v2+. apiKey is now required, including on the login route: return process.env.SHOPIFY_API_KEY from its loader. v2 and later require Node 22. Read the library changelog before upgrading a real app.
Don't bump React Router past 7.18.2 yet. In September 2026 the template pinned React Router to 7.18.2, because 7.18.3 made every action return
400 Bad Requestundershopify app devand behind TLS-terminating proxies (template changelog). Check that changelog before upgrading React Router.
Step 6: Add your first page
Let's add the page our badge app will use. Create app/routes/app.badges.tsx:
export default function BadgesPage() {
  return (
    <s-page heading="Product badges">
      <s-section heading="Coming soon">
        <s-paragraph>
          This is where merchants will manage product badges.
        </s-paragraph>
      </s-section>
    </s-page>
  );
}
Then add a link to it in <s-app-nav> in app/routes/app.tsx:
<s-link href="/app/badges">Badges</s-link>
Save both files. The page appears in the admin sidebar with no restart. In part 4 we'll fill it with real data.
Commands you'll use every day
| Command | What it does |
|---|---|
shopify app dev | Run locally with a tunnel and hot reload (p = preview, g = GraphiQL) |
shopify app dev --reset | Forget the saved app and store choices and ask again |
shopify app generate extension | Add a theme, checkout, admin or Function extension |
shopify app deploy | Create and release a new app version (config + extensions) |
shopify app config link / use | Link to another app or switch config files |
shopify app env show | Print the env vars your host needs |
shopify app graphiql | Standalone GraphiQL for your app |
shopify app execute | Run a GraphQL query from the terminal |
shopify app logs | Stream function and extension logs |
shopify app webhook trigger | Send a test webhook to your app |
The full list is in the Shopify CLI app command reference.
Also Read: Shopify App Billing in 2026: Tooling App Pricing vs Billing API
Troubleshooting
- "Node version not supported": CLI 4 needs Node 22.12+. Use
nvm install 22or similar. - Every form submit returns 400: you probably upgraded React Router to 7.18.3 or later. Pin it back to 7.18.2 (see above).
- The app loads the wrong store: run
shopify app dev --reset. - The Cloudflare tunnel is blocked on your network: start your own tunnel (for example ngrok) and pass it with
--tunnel-url.--use-localhostalso works for some extension development (app devflags). - "Flag not specified: --organization-id or --client-id": you're running
app initnon-interactively. Pass--organization-idor--client-id.
FAQ
Should I choose JavaScript or TypeScript?
TypeScript. The template's GraphQL codegen (npm run graphql-codegen) generates types for your Admin API queries, which catches mistakes before Shopify does.
Also Read: Find the Best ReactJS Developer for Your Project - JavaScript
Can I use Next.js, Laravel or another framework instead?
Yes, but you give up the template's built-in auth and session handling. Shopify now ships official PHP and Python packages. For other stacks you can implement token exchange yourself using the auth docs.
Do I still need to write OAuth code?
Not for embedded apps. Shopify managed installation installs the app and applies the scopes from shopify.app.toml. Token exchange then turns the session token into an access token. The template handles both.
Also Read: How to Publish a Shopify App to the App Store (2026)
Where are my API key and secret?
In the Dev Dashboard under your app's settings, or run shopify app env show. Never commit them.
Also Read: 13 Most Promising NodeJS Frameworks in 2023
Next up
The app runs, but it doesn't do anything useful yet. In Part 4: GraphQL Admin API, Webhooks and Metafields we'll build the badge editor: query products, save badges as app-owned metafields, handle webhooks, and build the UI with Polaris web components.