Shopify GraphQL Admin API, Metafields and Webhooks: Building Real App Features
In part 3 we got the React Router template running inside the Shopify admin. Now we'll build a real feature: the badge editor for our TWT Product Badges app.
Also Read: Programming and Development
By the end of this post the app will:
- List products using the GraphQL Admin API
- Save a badge per product as an app-owned metafield, declared in
shopify.app.toml - Show an editable table built with Polaris web components, with App Bridge toasts
- Handle webhooks, including the three mandatory compliance webhooks
Series: Shopify App Development 2026, part 4 of 8
How a request is authenticated
Every call in this post starts with authenticate.admin(request), so it's worth knowing what that does.
Also Read: Web Development Guide
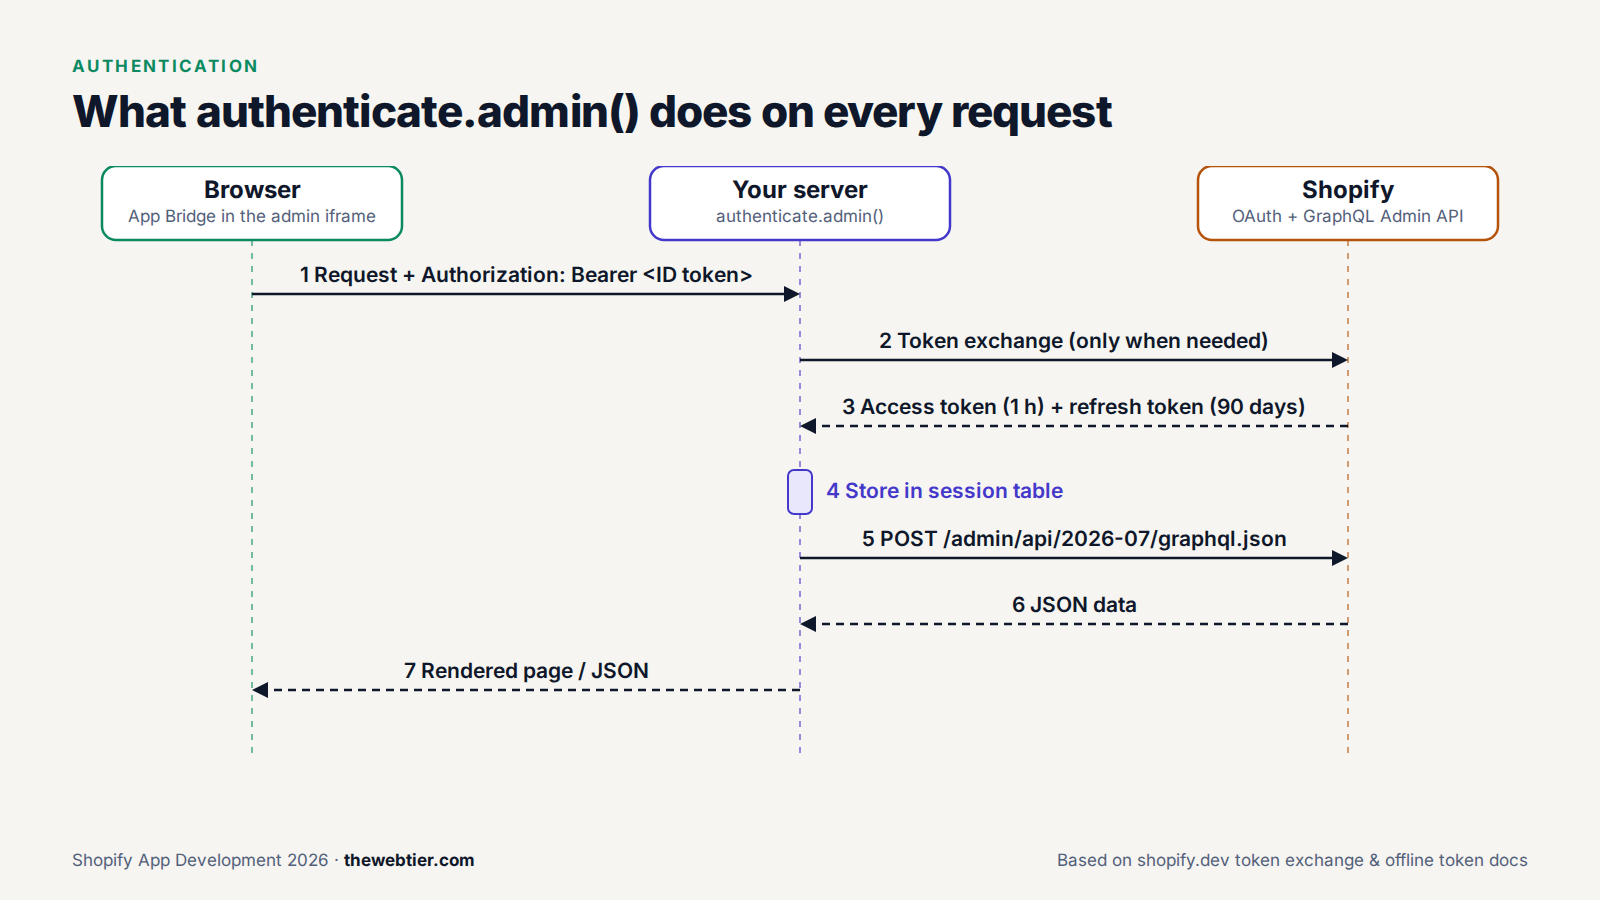
- Your App Home page runs inside the admin iframe. App Bridge adds a short-lived ID token (a JWT, also called a session token) to each request to your server.
authenticate.admin()verifies that token. If there's no valid access token for the shop, it performs token exchange, swapping the ID token for an access token at Shopify's/admin/oauth/access_tokenendpoint.- The access token is stored in your session table. It's an expiring offline token that refreshes automatically.
- You get back an
admin.graphql()client that's already authenticated for that shop.
You never touch tokens directly. If you're curious, Shopify documents the flow under token exchange.
GraphQL Admin API essentials
- GraphQL only. The REST Admin API has been legacy since October 2024, and new public apps must use GraphQL only (since April 1, 2025). REST notice
- Quarterly versions. Shopify releases a new API version every three months (
2026-01,2026-04,2026-07,2026-10…). Each is supported for at least 12 months. As of September 2026, 2026-07 is the latest stable version, and 2026-10 becomes stable on October 1. Versioning - Cost-based rate limits. Each query has a calculated cost in points, and the response's
extensions.costshows your remaining budget. Ask only for the fields you need. - Try queries first. Press
gwhileshopify app devis running to open GraphiQL, already authenticated as your app. You can also runshopify app execute.
Step 1: Decide where the data lives
Our app stores one short string per product. You have three options:
Also Read: Web Development Guide
| Option | Good for | Downsides |
|---|---|---|
| Your own database | Complex app data, analytics, anything Shopify doesn't model | You have to sync it and host it, and themes can't read it |
| Metafields | Extra fields on existing resources (products, orders, customers…) | Size limits; not a general-purpose database |
| Metaobjects | New record types (for example "Size chart", "Author") | More setup |
A badge belongs to a product, and the storefront needs to read it, so a product metafield is the natural choice. We'll make it app-owned by using the reserved $app namespace, so other apps can't overwrite it.
Step 2: Declare the metafield in shopify.app.toml
You can now declare metafield and metaobject definitions in your app config instead of creating them with GraphQL mutations at install time (declarative custom data). Add this to shopify.app.toml:
[access_scopes]
scopes = "read_products,write_products"

[product.metafields.app.badge]
name = "Badge"
description = "Short label shown on the product, like New or Bestseller"
type = "single_line_text_field"
access.admin = "merchant_read_write"
access.storefront = "public_read"
A few things to note:
[product.metafields.app.badge]creates a product metafield in the$appnamespace with the keybadge.access.admin = "merchant_read_write"lets merchants see and edit it in the product page's metafields section too.access.storefront = "public_read"makes it readable on the storefront. Our theme app extension needs this in part 5.- The definition is created when
shopify app devsyncs or when you runshopify app deploy. Limits: 128 definitions per resource type, and 25 definition changes per deploy.
Because we changed the scopes, shopify app dev will ask the dev store to approve the new permissions. That's managed installation at work.
Also Read: Web Development: Shopify App Billing
Step 3: Query products with their badge
The loader runs on the server before the page renders. We ask for the 20 most recently updated products and use a GraphQL alias (badge:) to fetch our metafield alongside each one:
const PRODUCTS_QUERY = `#graphql
  query ProductsWithBadges($first: Int!) {
    products(first: $first, sortKey: UPDATED_AT, reverse: true) {
      nodes {
        id
        title
        badge: metafield(namespace: "$app", key: "badge") {
          value
        }
      }
    }
  }`;

export const loader = async ({ request }: LoaderFunctionArgs) => {
  const { admin } = await authenticate.admin(request);

  const response = await admin.graphql(PRODUCTS_QUERY, {
    variables: { first: 20 },
  });
  const { data } = await response.json();

  return { products: data?.products.nodes ?? [] };
};
The #graphql tag at the start of the string lets the template's codegen (npm run graphql-codegen) generate TypeScript types for the query, and it gives you syntax highlighting in VS Code.
More than 20 products? Use cursor pagination (
first,after, andpageInfo { hasNextPage endCursor }). To process a whole catalogue, use bulk operations:shopify app bulk executein the CLI, orbulkOperationRunQueryin code.
Step 4: Save the badge with metafieldsSet
metafieldsSet creates or updates up to 25 metafields in one call (docs). Metafield values can't be blank, so an empty badge calls metafieldsDelete instead:
export const action = async ({ request }: ActionFunctionArgs) => {
  const { admin } = await authenticate.admin(request);
  const form = await request.formData();
  const ownerId = String(form.get("productId"));
  const badge = String(form.get("badge") ?? "").trim();

  // Metafield values can't be blank, so an empty badge means "delete it".
  const response = badge
    ? await admin.graphql(SET_BADGE_MUTATION, {
        variables: {
          metafields: [
            {
              ownerId,
              namespace: "$app",
              key: "badge",
              type: "single_line_text_field",
              value: badge,
            },
          ],
        },
      })
    : await admin.graphql(DELETE_BADGE_MUTATION, {
        variables: { metafields: [{ ownerId, namespace: "$app", key: "badge" }] },
      });

  const { data } = await response.json();
  const result = data?.metafieldsSet ?? data?.metafieldsDelete;
  const errors: { message: string }[] = result?.userErrors ?? [];

  return { ok: errors.length === 0, errors };
};
Always check userErrors. A GraphQL mutation can return HTTP 200 and still fail validation. Shopify reports those failures in userErrors, not as exceptions.
Step 5: Build the UI with Polaris web components
Polaris web components became stable in October 2025, and Polaris React was archived in September 2026. They're plain custom elements (<s-page>, <s-section>, <s-table>, <s-text-field> …), so they work in React, Preact, Vue or plain HTML. The @shopify/polaris-types package in the template gives you TypeScript autocomplete for them. Browse them in the component catalogue.
Also Read: How to Become a Shopify App Developer (2026 Guide) - Web Development
Here's the complete app/routes/app.badges.tsx. We type-checked and built it against @shopify/shopify-app-react-router 3.0.0:
import type { ActionFunctionArgs, LoaderFunctionArgs } from "react-router";
import { useFetcher, useLoaderData } from "react-router";
import { useEffect } from "react";
import { useAppBridge } from "@shopify/app-bridge-react";
import { authenticate } from "../shopify.server";

const PRODUCTS_QUERY = `#graphql
  query ProductsWithBadges($first: Int!) {
    products(first: $first, sortKey: UPDATED_AT, reverse: true) {
      nodes {
        id
        title
        badge: metafield(namespace: "$app", key: "badge") {
          value
        }
      }
    }
  }`;

const SET_BADGE_MUTATION = `#graphql
  mutation SetBadge($metafields: [MetafieldsSetInput!]!) {
    metafieldsSet(metafields: $metafields) {
      metafields {
        key
        value
      }
      userErrors {
        field
        message
      }
    }
  }`;

const DELETE_BADGE_MUTATION = `#graphql
  mutation DeleteBadge($metafields: [MetafieldIdentifierInput!]!) {
    metafieldsDelete(metafields: $metafields) {
      userErrors {
        field
        message
      }
    }
  }`;

export const loader = async ({ request }: LoaderFunctionArgs) => {
  const { admin } = await authenticate.admin(request);

  const response = await admin.graphql(PRODUCTS_QUERY, {
    variables: { first: 20 },
  });
  const { data } = await response.json();

  // Run `npm run graphql-codegen` to get these types generated for you.
  type ProductRow = { id: string; title: string; badge: { value: string } | null };
  return { products: (data?.products.nodes ?? []) as ProductRow[] };
};

export const action = async ({ request }: ActionFunctionArgs) => {
  const { admin } = await authenticate.admin(request);
  const form = await request.formData();
  const ownerId = String(form.get("productId"));
  const badge = String(form.get("badge") ?? "").trim();

  // Metafield values can't be blank, so an empty badge means "delete it".
  const response = badge
    ? await admin.graphql(SET_BADGE_MUTATION, {
        variables: {
          metafields: [
            {
              ownerId,
              namespace: "$app",
              key: "badge",
              type: "single_line_text_field",
              value: badge,
            },
          ],
        },
      })
    : await admin.graphql(DELETE_BADGE_MUTATION, {
        variables: { metafields: [{ ownerId, namespace: "$app", key: "badge" }] },
      });

  const { data } = await response.json();
  const result = data?.metafieldsSet ?? data?.metafieldsDelete;
  const errors: { message: string }[] = result?.userErrors ?? [];

  return { ok: errors.length === 0, errors };
};

export default function BadgesPage() {
  const { products } = useLoaderData<typeof loader>();

  return (
    <s-page heading="Product badges">
      <s-section heading="Recently updated products">
        <s-table>
          <s-table-header-row>
            <s-table-header>Product</s-table-header>
            <s-table-header>Badge</s-table-header>
          </s-table-header-row>
          <s-table-body>
            {products.map((product) => (
              <BadgeRow
                key={product.id}
                id={product.id}
                title={product.title}
                badge={product.badge?.value ?? ""}
              />
            ))}
          </s-table-body>
        </s-table>
      </s-section>
    </s-page>
  );
}

function BadgeRow(props: { id: string; title: string; badge: string }) {
  const fetcher = useFetcher<typeof action>();
  const shopify = useAppBridge();
  const saving = fetcher.state !== "idle";

  useEffect(() => {
    if (!fetcher.data) return;
    if (fetcher.data.ok) {
      shopify.toast.show("Badge saved");
    } else {
      shopify.toast.show(fetcher.data.errors[0]?.message ?? "Could not save", {
        isError: true,
      });
    }
  }, [fetcher.data, shopify]);

  return (
    <s-table-row>
      <s-table-cell>{props.title}</s-table-cell>
      <s-table-cell>
        <fetcher.Form method="post">
          <input type=hidden name=productId value={props.id} />
          <s-stack direction="inline" gap="small-200">
            <s-text-field
              label="Badge text"
              labelAccessibilityVisibility="exclusive"
              name=badge
              defaultValue={props.badge}
              placeholder="e.g. New, Bestseller"
            />
            <s-button type=submit loading={saving}>
              Save
            </s-button>
          </s-stack>
        </fetcher.Form>
      </s-table-cell>
    </s-table-row>
  );
}
What's going on:
- Each row has its own
useFetcher(), so saving one product doesn't reload the whole page or block other rows. <s-text-field name=badge>and<s-button type=submit>work with a normal<form>. Polaris web components are form-associated.useAppBridge()gives you the globalshopifyobject.shopify.toast.show()shows the native admin toast.labelAccessibilityVisibility="exclusive"hides the label visually but keeps it for screen readers, which is the right choice inside a table.
Step 6: Webhooks, done properly
Webhooks tell your app when something happens in a store, such as a product update, an order, or an uninstall. In 2026 the recommended way to subscribe is app-specific subscriptions in shopify.app.toml. They apply to every shop that installs your app, and they deploy with shopify app deploy (docs).
[webhooks]
api_version = "2026-07"

  [[webhooks.subscriptions]]
  topics = ["app/uninstalled"]
  uri = "/webhooks/app/uninstalled"

  [[webhooks.subscriptions]]
  topics = ["app/scopes_update"]
  uri = "/webhooks/app/scopes_update"

  # Only receive product updates when the price is at least 10.00
  [[webhooks.subscriptions]]
  topics = ["products/update"]
  uri = "/webhooks/products/update"
  filter = "variants.price:>=10.00"
Filters (like the one above) and include_fields cut down noise and cost. Besides HTTPS, you can deliver webhooks to Google Pub/Sub or Amazon EventBridge, which handle traffic spikes better.
Mandatory compliance webhooks
Every App Store app must subscribe to three privacy webhooks, even if it stores no personal data. Apps without them are rejected (privacy compliance):
  [[webhooks.subscriptions]]
  compliance_topics = ["customers/data_request", "customers/redact", "shop/redact"]
  uri = "/webhooks/compliance"
And the handler, app/routes/webhooks.compliance.tsx:
import type { ActionFunctionArgs } from "react-router";
import { authenticate } from "../shopify.server";
import db from "../db.server";

// Handles customers/data_request, customers/redact and shop/redact.
// authenticate.webhook() verifies the HMAC signature and throws a
// 401 response if it doesn't match, which is what Shopify's review checks for.
export const action = async ({ request }: ActionFunctionArgs) => {
  const { topic, shop, payload } = await authenticate.webhook(request);

  switch (topic) {
    case "CUSTOMERS_DATA_REQUEST":
      // Look up anything you store about payload.customer and send it
      // to the merchant. This demo app stores no customer data.
      break;
    case "CUSTOMERS_REDACT":
      // Delete anything you store about payload.customer.
      break;
    case "SHOP_REDACT":
      // Sent 48 hours after uninstall: delete everything for this shop.
      await db.session.deleteMany({ where: { shop } });
      break;
  }

  console.log(`Handled ${topic} for ${shop}`, payload?.shop_id);
  return new Response();
};
Webhook rules to follow
- Verify the HMAC.
authenticate.webhook()checks theX-Shopify-Hmac-SHA256signature against your client secret and returns a 401 if it's invalid. We confirmed this in the library source. Shopify's automated review checks this. - Respond fast. Shopify allows 1 second to connect and 5 seconds for the whole request. Put slow work on a queue and return
200straight away. - Expect duplicates and retries. Failed deliveries are retried 8 times over 4 hours, and after that the delivery is lost. Subscriptions created with the Admin API are deleted automatically after 8 consecutive failures; ones declared in
shopify.app.tomlaren't (HTTPS delivery docs). Deduplicate using the webhook ID (webhookIdfromauthenticate.webhook()). - Webhooks can arrive after uninstall. That's why the template's
app/uninstalledhandler checks thatsessionexists before deleting. - Test locally with
shopify app webhook trigger, or by changing data in your dev store whileapp devis running.
What's next for webhooks: Shopify's new Events system is in developer preview. It adds field-level triggers and custom GraphQL payloads, so you can say exactly which fields changed and what data you want back (Events docs). Use regular webhooks in production for now.
Bonus: request extra permissions only when needed
Asking for fewer scopes at install makes merchants more likely to approve. With optional scopes you request extra permissions later, when the merchant turns on a feature that needs them:
[access_scopes]
scopes = "read_products,write_products"
optional_scopes = ["read_orders"]
// In the browser, via App Bridge. Shows Shopify's permission modal.
await shopify.scopes.request(["read_orders"]);
Subscribe to app/scopes_update (the template already does) so you know when permissions change.
Also Read: Shopify App Development in 2026: The Complete Roadmap
FAQ
Should I store app data in metafields or my own database?
Use metafields when the data belongs to a Shopify resource and a theme, checkout or Function needs to read it. Use your own database for app-specific state such as settings, logs, jobs and analytics. Most real apps use both.
What's the difference between $app and a normal namespace?
$app resolves to a namespace reserved for your app. Other apps can't write to it, and you don't need to hard-code your app ID. Merchant-owned namespaces (like custom) can be edited by anyone with access.
How do I avoid hitting GraphQL rate limits?
Request fewer fields, paginate, cache what doesn't change often, and use bulk operations for large exports. Check extensions.cost.throttleStatus in responses and back off when you're running low.
Do I need to register webhooks in code anymore?
Not for most apps. App-specific subscriptions in shopify.app.toml are the recommended approach. Use the GraphQL webhookSubscriptionCreate mutation only when subscriptions need to differ from shop to shop.
Next up
Merchants can now set badges, but shoppers can't see them yet. In Part 5: Shopify App Extensions Explained we'll build a theme app extension that shows the badge on the storefront. We'll also look at checkout UI extensions, admin blocks and Shopify Functions.