How to Deploy a Shopify App to Production
Up to now, TWT Product Badges has run on your laptop through a tunnel. Before App Store review (part 8) it needs a permanent, secure home.
Also Read: Shopify - What is it, Plans, Advantages & Disadvantages
This post covers:
- The two separate deploys every Shopify app needs
- Setting up a separate production app
- Choosing a host
- Moving from SQLite to Postgres
- Environment variables
- App versions and rollbacks
- Automating it with GitHub Actions
Series: Shopify App Development 2026, part 7 of 8
Also Read: 3 Biggest Wins of Docker - The Web Tier
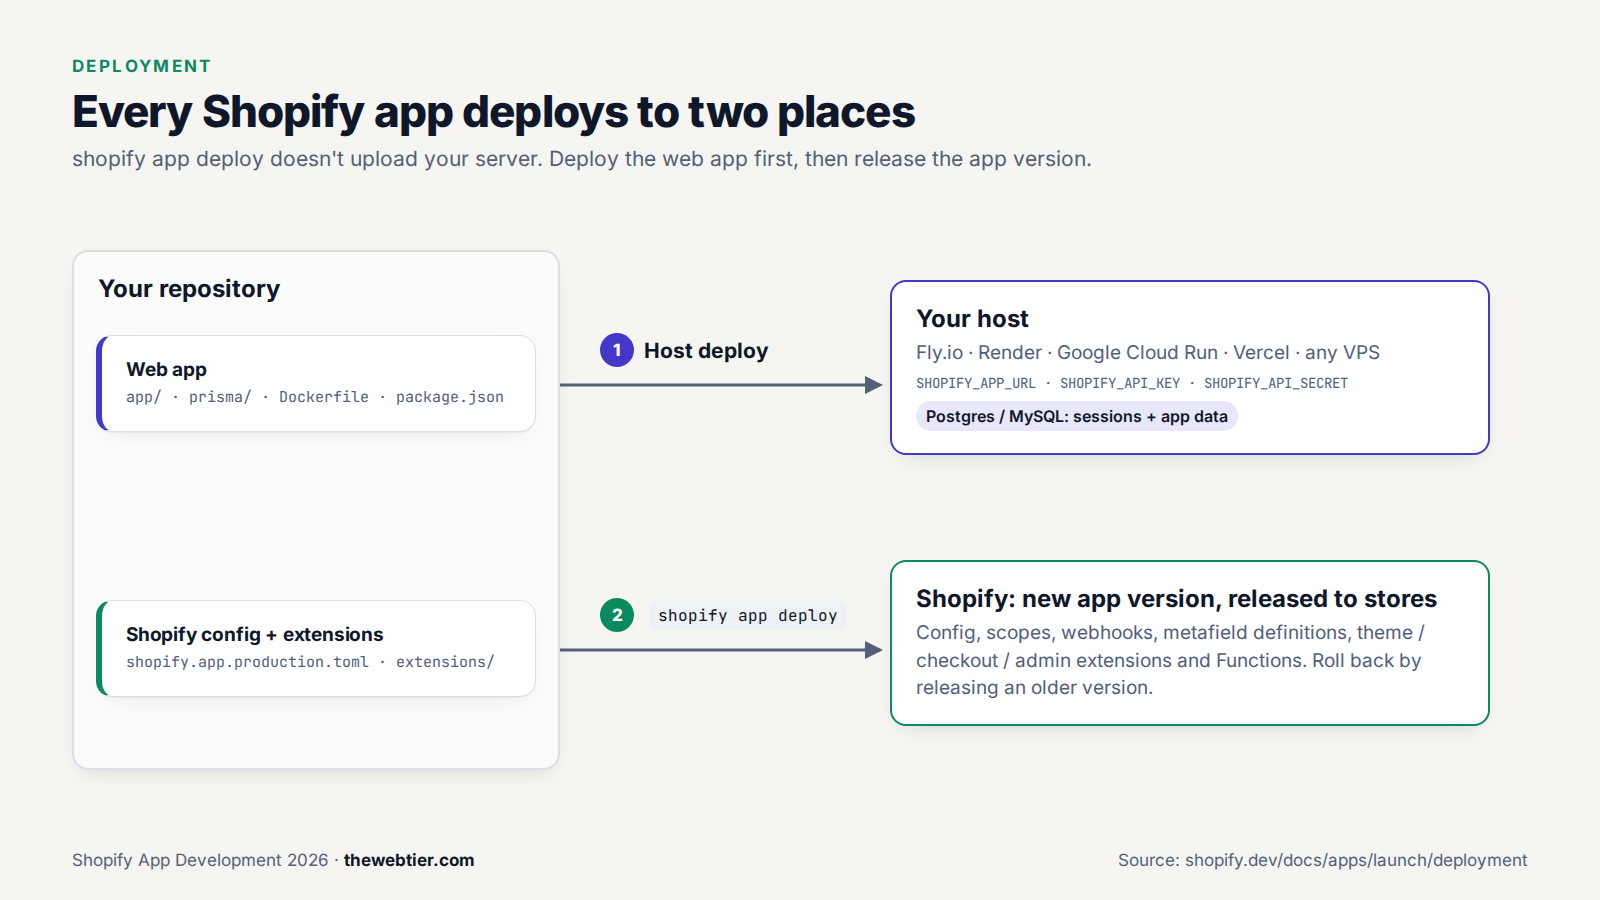
Every Shopify app deploys to two places
This confuses almost everyone the first time. shopify app deploy does not deploy your web app. Shopify's docs are blunt about it: "Releasing an app version doesn't release your web app" (app versions).
Also Read: Reviews and Web
| What | Where it goes | How |
|---|---|---|
| Web app (React Router server, App Home, webhooks, database) | Your host (Fly.io, Render, Cloud Run, Vercel…) | Your host's deploy process (Docker, git push, etc.) |
App config + extensions (shopify.app.toml, theme, checkout and admin extensions, Functions) | Shopify | shopify app deploy creates and releases an app version |
Deploy the web app first, then run shopify app deploy, so the new config never points at code that isn't live yet.
Also Read: Reviews and Web
Step 1: Create a separate production app
Shopify recommends separate apps for development and production. Your dev app's URLs change every time the tunnel restarts, and you don't want merchants on the same app you're breaking locally.
# Create or link a second app and a new config file
shopify app config link
# When prompted, create a new app (e.g. "TWT Product Badges")
# and name the config "production" → creates shopify.app.production.toml
Then edit shopify.app.production.toml so it points at your real domain:
name = "TWT Product Badges"
client_id = "your-production-client-id"
handle = "twt-product-badges"
application_url = "https://badges.thewebtier.com"
embedded = true

[access_scopes]
scopes = "read_products,write_products"

[auth]
redirect_urls = ["https://badges.thewebtier.com/auth/callback"]

[webhooks]
api_version = "2026-07"

  [[webhooks.subscriptions]]
  topics = ["app/uninstalled"]
  uri = "/webhooks/app/uninstalled"

  [[webhooks.subscriptions]]
  topics = ["app/scopes_update"]
  uri = "/webhooks/app/scopes_update"

  [[webhooks.subscriptions]]
  compliance_topics = ["customers/data_request", "customers/redact", "shop/redact"]
  uri = "/webhooks/compliance"

[product.metafields.app.badge]
name = "Badge"
type = "single_line_text_field"
access.admin = "merchant_read_write"
access.storefront = "public_read"

[build]
automatically_update_urls_on_dev = false
Switch between configs with shopify app config use production (or use dev), or pass --config production to individual commands. The app configuration reference lists every field.
App URL rule: your app URLs can't contain "Shopify" or "Example" (or misspellings of them). App Store review checks this.
Step 2: Choose a host
As of September 2026, Shopify documents these options on its deployment page:
| Host | Guide | Good fit if… |
|---|---|---|
| Google Cloud Run | Shopify's own guide | You want serverless containers plus Cloud SQL Postgres |
| Fly.io | fly.io/shopify | You want simple Docker deploys close to your users |
| Render | Render guide | You want a Heroku-style experience with managed Postgres |
| Vercel | Vercel guide | You're already on Vercel |
| Anything else (VPS, Railway, DigitalOcean, Laravel Forge boxes…) | Manual deployment | You're comfortable running Node and a database |
Two notes:
- Shopify doesn't host app backends. Oxygen is only for Hydrogen storefronts. If you want no server at all, an extension-only "static app" built on an App Home UI extension is the closest thing (Shopify hosts it), but it's limited to custom distribution (part 5).
- Heroku no longer appears in Shopify's list of documented hosts. It still works like any Node host.
The template includes a Dockerfile, so any container host works out of the box. One gotcha: it's based on node:20-alpine. If you upgraded to @shopify/shopify-app-react-router v2 or v3 in part 3, change it to node:22-alpine, since those versions require Node 22.
Also Read: Programming: Shopify Ditches React
Step 3: Move from SQLite to Postgres
The template stores sessions in SQLite through Prisma. That's fine locally, but risky in production. Shopify's own docs warn:
- SQLite is a file, so it needs a persistent disk.
- You can't scale to several containers without extra work.
- Hosts that put idle containers to sleep (Fly.io is the example Shopify gives) can wipe the SQLite database, and on Cloud Run "sessions and data would be lost on every deployment".
Lost sessions mean broken installs, so use Postgres (or MySQL). In prisma/schema.prisma:
datasource db {
  provider = "postgresql"
  url      = env("DATABASE_URL")
}
The template's existing migration was written for SQLite (it uses DATETIME), so generate a fresh one for Postgres:
rm -rf prisma/migrations
DATABASE_URL="postgresql://user:pass@localhost:5432/badges" \
  npx prisma migrate dev --name init
Commit the new migration. On the server, npm run setup (prisma generate && prisma migrate deploy) applies it. The template's docker-start script runs setup automatically before starting.
Also Read: Shopify SEO Guide: Your Ultimate Tooling Step-by-Step Guide to Rank #1
Security: Shopify recommends encrypting access tokens at rest in your database, so a database leak doesn't expose store access. Also turn on encryption and backups on your managed Postgres. That covers some of the protected customer data requirements you'll meet in part 8.
Other official session storage adapters include MySQL, Redis, MongoDB, DynamoDB, Drizzle and Cloudflare KV (shopify-app-js).
Also Read: Web Development: Shopify GraphQL Admin
Step 4: Set environment variables
| Variable | Required | Value |
|---|---|---|
SHOPIFY_APP_URL | ✅ | Your public origin, e.g. https://badges.thewebtier.com |
SHOPIFY_API_KEY | ✅ | Your production app's client ID |
SHOPIFY_API_SECRET | ✅ | Your production app's client secret. Keep it in your host's secret manager |
DATABASE_URL | ✅ (with Postgres) | Postgres connection string |
NODE_ENV | Recommended | production |
SCOPES | Optional | Not needed with managed installation, because scopes come from the TOML |
PORT | Optional | Defaults to 3000 |
Print the Shopify values for the linked config:
shopify app env show --config production
# or, in a format you can eval:
shopify app info --web-env
Full list: deploy to a hosting service.
Also Read: How to Make Money on How To's Shopify? | The Web Tier
Step 5: Deploy the web app
With Docker hosts it's docker build and push, or the host's CLI (fly deploy, a Render git push, gcloud run deploy…). On a plain server it's:
npm ci
npm run build          # react-router build
npm run setup          # prisma generate && prisma migrate deploy
npm run start          # react-router-serve ./build/server/index.js
Check that https://your-domain/ loads the template's landing page before you move on.
Behind a proxy or load balancer? In September 2026 the template pinned React Router to 7.18.2, because 7.18.3 made actions return
400behind TLS-terminating proxies. If every form submit fails in production, check your React Router version first (template changelog).
Step 6: Release to Shopify with shopify app deploy
shopify app deploy --config production
This builds your extensions, then creates and releases a new app version: a snapshot of your TOML config and every extension. Stores with your app installed usually get the update within a few minutes (deploy app versions).
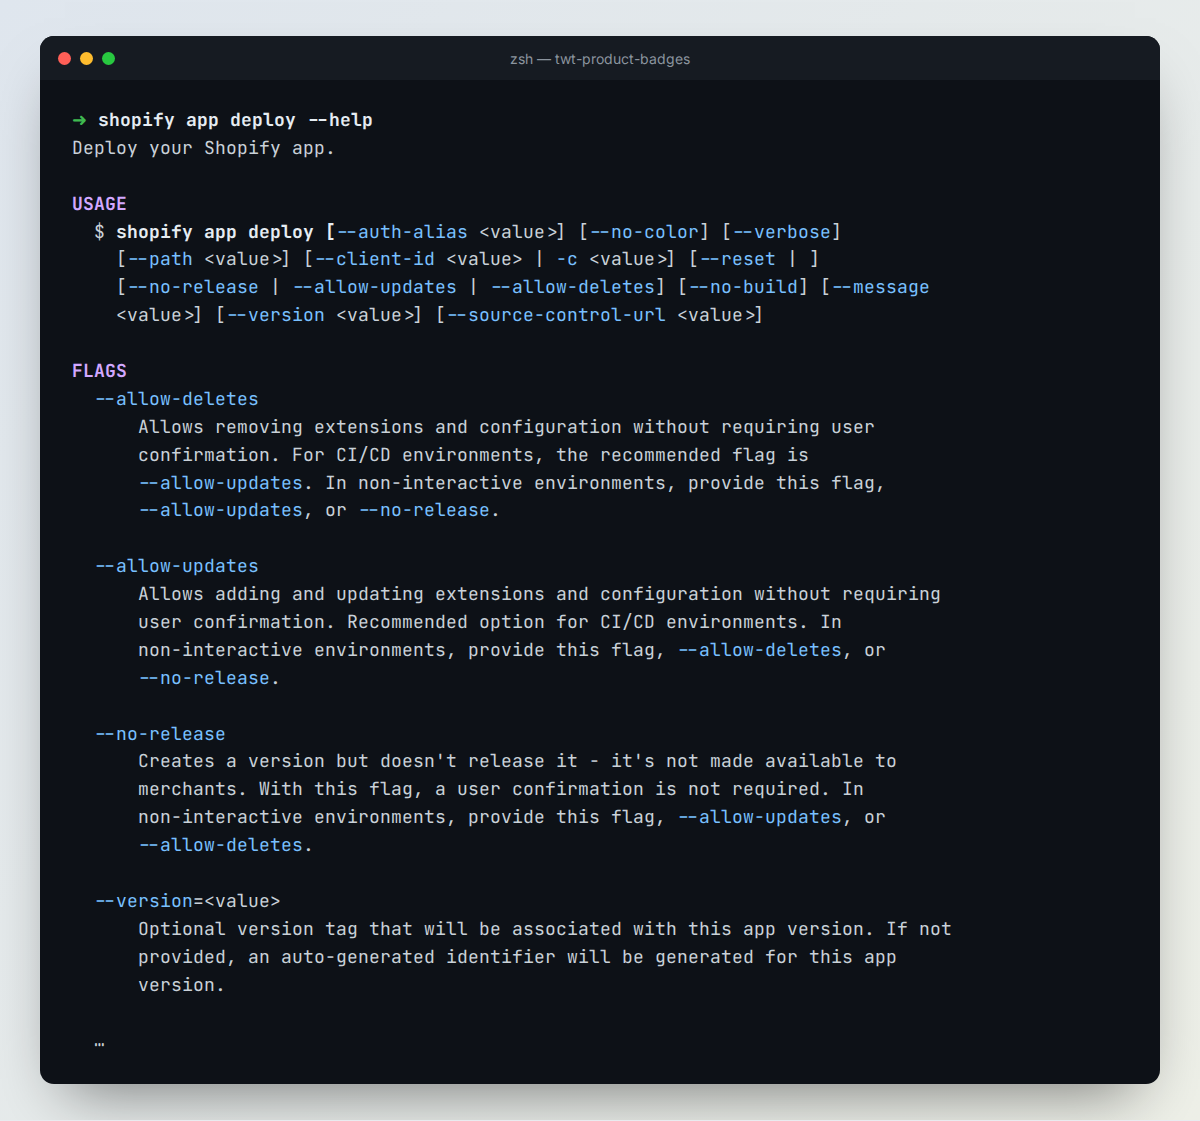
shopify app deploy --help in CLI 4.8.2.
Also Read: How to Become a Shopify App Developer (2026 Guide) - Web Development
Useful flags and commands:
# Name the version and add a note
shopify app deploy --config production --version v1.2.0 --message "Badge colours"

# Create a version without releasing it (release later, e.g. after QA)
shopify app deploy --config production --no-release
shopify app release --config production --version v1.2.0

# See history and roll back by releasing an older version
shopify app versions list --config production
shopify app release --config production --version v1.1.0
Careful with deletes. If you remove an extension or config and deploy, Shopify removes it from every store, along with its related data. CLI 4 makes you confirm this, or pass
--allow-deletes. Only use that flag deliberately, never by default in CI.
Step 7: Automate it with GitHub Actions
Generate an App Automation Token in the Dev Dashboard (your app → Settings → App Automation Token) and save it as the repository secret SHOPIFY_APP_AUTOMATION_TOKEN. Older tutorials use an organisation-wide Partner Dashboard CLI token (SHOPIFY_CLI_PARTNERS_TOKEN). Those keep working until they expire, but Shopify now recommends app-scoped automation tokens (CI/CD docs).
# .github/workflows/shopify-deploy.yml
name: Deploy Shopify app config & extensions

on:
  push:
    branches: [main]

jobs:
  deploy:
    runs-on: ubuntu-latest
    steps:
      - uses: actions/checkout@v4

      - uses: actions/setup-node@v4
        with:
          node-version: 22

      - run: npm ci
      - run: npm install -g @shopify/cli@latest

      - name: Deploy
        env:
          SHOPIFY_APP_AUTOMATION_TOKEN: ${{ secrets.SHOPIFY_APP_AUTOMATION_TOKEN }}
          COMMIT_URL: ${{ github.server_url }}/${{ github.repository }}/commit/${{ github.sha }}
        run: shopify app deploy --config production --allow-updates --source-control-url "$COMMIT_URL"
--allow-updates lets CI add and update extensions and config without a prompt. It deliberately doesn't allow deletions. --source-control-url links each app version to its commit in the Dev Dashboard. The CLI's auto-upgrade is turned off in CI, so pin a CLI version if you want fully reproducible builds.
Also Read: Is Shopify Good for Beginners? | The Web Tier - Reviews
Run this job after your web app deploy job succeeds, for example with needs: in the same workflow.
Step 8: Monitor it
- Dev Dashboard → Logs and monitoring: webhook deliveries, Function runs, App Events and API health, filterable by shop and status (monitoring docs).
shopify app logs: stream Function and extension logs in your terminal.- Admin Web Vitals: the Dev Dashboard now shows your App Home's LCP, CLS and INP against the Built for Shopify thresholds. Keep an eye on them from day one.
- Your host's logs and uptime checks: failed webhook deliveries are dropped after 8 retries over 4 hours (and Admin API subscriptions get deleted), so alert on 5xx errors.
Production checklist
- Separate production app, with
shopify.app.production.tomlcommitted - HTTPS on a domain without "shopify" or "example" in it
- Postgres (or MySQL) with backups and encryption at rest
- Access tokens encrypted in the database
- Env vars set in the host's secret manager, not in git
- Compliance webhooks subscribed, with HMAC failures returning 401
- Billing uses real charges (no hard-coded
test: true) shopify app deployrun after the web deploy, and automated in CI- Monitoring and alerts on webhook failures and 5xx errors
FAQ
Does shopify app deploy upload my React Router server?
No. It only releases your app configuration and extensions to Shopify. Your server goes to your own host.
Also Read: Shopify App Development in 2026: The Complete Roadmap
Can I host a Shopify app on shared hosting?
Only if it can run a long-lived Node.js process with HTTPS. Most shared PHP hosting can't. A small VPS or a free or cheap tier on Fly.io, Render or Cloud Run works well.
Also Read: Kubernetes Training: A Complete Overview
How do I roll back a bad release?
Release an older version with shopify app release --version <name>. That rolls back config and extensions. Roll back your web app separately on your host.
Do I need separate dev and production apps?
Shopify recommends it. It keeps tunnel URLs, test data and experiments away from real merchants, and lets you test deploys safely.
Next up
The app is live and ready for merchants. In the final part, Part 8: How to Publish a Shopify App to the App Store, we'll write an SEO-friendly listing, go through the review requirements, avoid the common rejection reasons, and aim for Built for Shopify.