Shortcodes still work, but the block editor is where WordPress users spend their time. In this post we build a custom Gutenberg block, a Reading Time block users can drop into any post or template. It shows a live estimate while they write, and the same result on the front end.
Also Read: News and Web
This is Part 4 of our plugin series. We're adding the block to the plugin we built in Part 3, so it reuses the PHP functions we already have.
Static vs dynamic blocks: which one are we building?
There are two kinds of blocks:
- Static blocks save their final HTML into the post content through a JavaScript
save()function. Change that markup later and existing posts show "This block contains unexpected or invalid content". - Dynamic blocks save only their attributes. PHP renders the HTML on every page view.
Reading time has to be calculated from the post's current content, so it's naturally dynamic. Dynamic blocks are also easier to change after launch, which is why the dynamic variant of create-block is a good default for plugin blocks.
Also Read: WordPress Development and PHP
Before you start: WordPress 7.1 and the iframed editor
From WordPress 7.1 the post editor always runs inside an iframe, whatever apiVersion your blocks declare. In practice:
- Use
apiVersion: 3(create-block does this by default). - Load editor styles through
block.json(editorStyleandstyle), not by enqueueing CSS on the admin page. - Don't reach for
documentorwindowof the admin page from block code. You're inside the iframe.
Background is in the 7.1 iframe dev note.
Step 1: Scaffold the block with create-block
@wordpress/create-block is the official scaffolding tool. It has two modes.
Starting from nothing? It generates a complete plugin, including a build setup, in one command:
Also Read: WordPress Development Guide
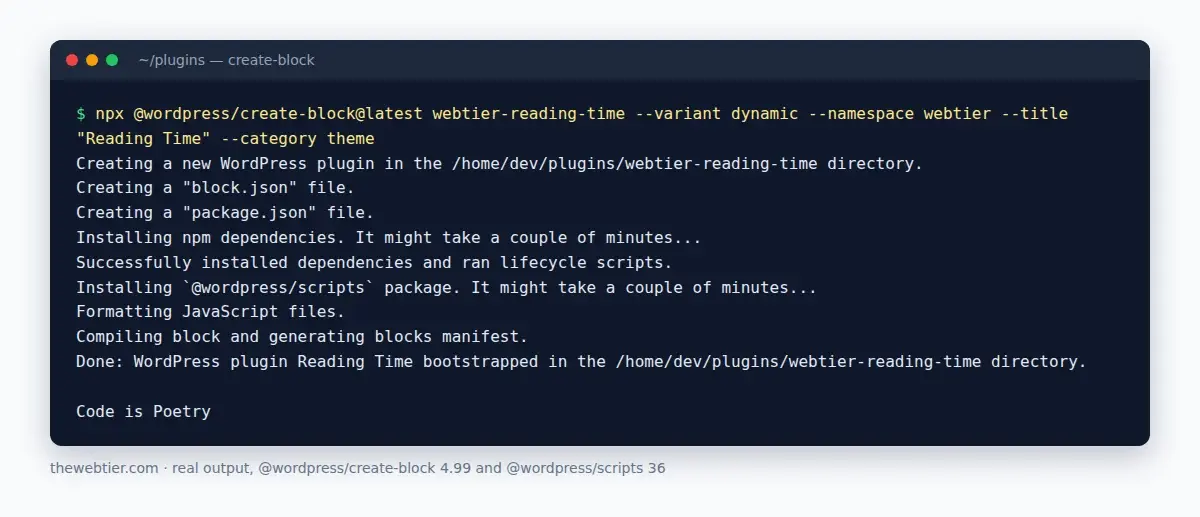
Adding a block to an existing plugin? That's our case. Use --no-plugin to generate only the block files. From the plugin root:
npx @wordpress/create-block@latest reading-time \
  --no-plugin \
  --variant dynamic \
  --namespace webtier \
  --title "Reading Time" \
  --target-dir src/reading-time
Then add the build tooling. @wordpress/scripts wraps webpack, Babel, Sass, ESLint and more, preconfigured for WordPress:
npm init -y
npm install --save-dev @wordpress/scripts
Add these scripts to package.json:
"scripts": {
	"build": "wp-scripts build --webpack-copy-php --blocks-manifest",
	"start": "wp-scripts start --webpack-copy-php --blocks-manifest",
	"lint:js": "wp-scripts lint-js",
	"lint:css": "wp-scripts lint-style",
	"format": "wp-scripts format",
	"plugin-zip": "wp-scripts plugin-zip"
}
--webpack-copy-phpcopiesrender.phpintobuild/.--blocks-manifestgeneratesbuild/blocks-manifest.php, which lets WordPress register every block in one fast call.
Node version check:
@wordpress/scripts36 requires Node 22.22.2+ (or 24.15+). If the install fails with an engine error, see Part 2.
create-block's dynamic variant also creates a view.js front-end script. Our block needs no JavaScript on the front end, so delete src/reading-time/view.js and don't add viewScript to block.json. Shipping less JavaScript makes pages faster.
Step 2: Describe the block in block.json
block.json is the single source of truth for your block. PHP, JavaScript and the WordPress.org block directory all read it. Replace the generated one in src/reading-time/block.json with:
{
	"$schema": "https://schemas.wp.org/trunk/block.json",
	"apiVersion": 3,
	"name": "webtier/reading-time",
	"version": "1.0.0",
	"title": "Reading Time",
	"category": "theme",
	"icon": "clock",
	"description": "Shows how long the current post takes to read.",
	"keywords": [ "reading", "time", "minutes" ],
	"textdomain": "webtier-reading-time",
	"usesContext": [ "postId", "postType" ],
	"attributes": {
		"label": {
			"type": "string",
			"default": ""
		},
		"showIcon": {
			"type": "boolean",
			"default": true
		}
	},
	"supports": {
		"html": false,
		"color": {
			"text": true,
			"background": true
		},
		"spacing": {
			"padding": true
		},
		"typography": {
			"fontSize": true
		}
	},
	"example": {
		"attributes": {
			"label": "Reading time:"
		}
	},
	"editorScript": "file:./index.js",
	"editorStyle": "file:./index.css",
	"style": "file:./style-index.css",
	"render": "file:./render.php"
}
The important keys:
Also Read: WordPress Development: Publish a WordPress
| Key | What it does |
|---|---|
name | namespace/block-name. It's permanent, because posts store it, so never rename it after release. |
attributes | The data your block saves. Here: an optional label and a showIcon toggle. |
usesContext | Receives postId and postType from the parent. That's what makes the block work inside a Query Loop, where each post shows its own time. |
supports | Opts into core design tools. Colour, padding and font size appear in the sidebar with no extra code. |
render | Makes the block dynamic: WordPress includes render.php to produce the HTML. |
example | Powers the preview when users hover over the block in the inserter. |
Step 3: The editor component (edit.js)
src/reading-time/edit.js is a React component that controls what the block looks like in the editor. Ours reads the post content from the editor's data store, so the estimate updates live as you type:
import { __, _n, sprintf } from '@wordpress/i18n';
import { useBlockProps, InspectorControls } from '@wordpress/block-editor';
import { PanelBody, TextControl, ToggleControl } from '@wordpress/components';
import { useSelect } from '@wordpress/data';
import { store as coreStore } from '@wordpress/core-data';
import { count } from '@wordpress/wordcount';
import './editor.scss';

export default function Edit( { attributes, setAttributes, context } ) {
	const { label, showIcon } = attributes;
	const { postId, postType } = context;

	// Read the current post's content so the preview updates as you type.
	const content = useSelect(
		( select ) => {
			if ( ! postId || ! postType ) {
				return '';
			}
			const record = select( coreStore ).getEditedEntityRecord(
				'postType',
				postType,
				postId
			);
			const raw = record?.content;
			return typeof raw === 'function' ? raw( record ) : raw || '';
		},
		[ postId, postType ]
	);

	const wpm = window.webtierReadingTime?.wpm || 200;
	const words = count( content, 'words', {} );
	const minutes = Math.max( 1, Math.ceil( words / wpm ) );

	return (
		<>
			<InspectorControls>
				<PanelBody title={ __( 'Settings', 'webtier-reading-time' ) }>
					<TextControl
						__next40pxDefaultSize
						label={ __( 'Label', 'webtier-reading-time' ) }
						help={ __( 'Optional text shown before the time.', 'webtier-reading-time' ) }
						value={ label }
						onChange={ ( value ) => setAttributes( { label: value } ) }
					/>
					<ToggleControl
						label={ __( 'Show clock icon', 'webtier-reading-time' ) }
						checked={ showIcon }
						onChange={ ( value ) => setAttributes( { showIcon: value } ) }
					/>
				</PanelBody>
			</InspectorControls>
			<p { ...useBlockProps() }>
				{ showIcon && (
					<svg xmlns="http://www.w3.org/2000/svg" viewBox="0 0 24 24" width=1em height=1em aria-hidden="true" focusable="false">
						<path fill="currentColor" d="M12 3a9 9 0 1 0 0 18 9 9 0 0 0 0-18Zm0 16.5a7.5 7.5 0 1 1 0-15 7.5 7.5 0 0 1 0 15Zm.75-12h-1.5V12l3.9 2.3.75-1.3-3.15-1.85V7.5Z" />
					</svg>
				) }
				{ label && <span>{ label }</span> }
				<span>
					{ sprintf(
						/* translators: %d: number of minutes. */
						_n( '%d min read', '%d min read', minutes, 'webtier-reading-time' ),
						minutes
					) }
				</span>
			</p>
		</>
	);
}
The key pieces:
useBlockProps()adds the block's class names, the colour and spacing styles fromsupports, and the attributes the editor needs. Always spread it on your outermost element.InspectorControlsputs controls in the sidebar.setAttributes()saves changes.@wordpress/*imports aren't bundled.wp-scriptsmaps them to WordPress's own copies (wp.blockEditor,wp.data…) and lists them as dependencies inbuild/reading-time/index.asset.php. You don't need tonpm installthem, though installing them gives your editor autocompletion.
index.js from the scaffold stays as it is. It calls registerBlockType( metadata.name, { edit: Edit } ). Dynamic blocks have no save function.
Step 4: The front-end template (render.php)
src/reading-time/render.php runs on every page view. WordPress gives it three variables: $attributes, $content and $block. We reuse webtier_rt_calculate() and webtier_rt_format() from Part 3:
<?php
/**
 * Front-end output for the Reading Time block.
 *
 * Available variables: $attributes, $content, $block.
 *
 * @package WebtierReadingTime
 */

if ( ! defined( 'ABSPATH' ) ) {
	exit;
}

$webtier_rt_post_id = isset( $block->context['postId'] ) ? (int) $block->context['postId'] : get_the_ID();

if ( ! $webtier_rt_post_id ) {
	return;
}

$webtier_rt_minutes = webtier_rt_calculate( $webtier_rt_post_id );
$webtier_rt_label   = isset( $attributes['label'] ) ? $attributes['label'] : '';
$webtier_rt_icon    = ! empty( $attributes['showIcon'] );
?>
<p <?php echo get_block_wrapper_attributes(); // phpcs:ignore WordPress.Security.EscapeOutput.OutputNotEscaped -- Escaped by core. ?>>
	<?php if ( $webtier_rt_icon ) : ?>
		<svg xmlns="http://www.w3.org/2000/svg" viewBox="0 0 24 24" width=1em height=1em aria-hidden="true" focusable="false"><path fill="currentColor" d="M12 3a9 9 0 1 0 0 18 9 9 0 0 0 0-18Zm0 16.5a7.5 7.5 0 1 1 0-15 7.5 7.5 0 0 1 0 15Zm.75-12h-1.5V12l3.9 2.3.75-1.3-3.15-1.85V7.5Z"/></svg>
	<?php endif; ?>
	<?php if ( $webtier_rt_label ) : ?>
		<span><?php echo esc_html( $webtier_rt_label ); ?></span>
	<?php endif; ?>
	<span><?php echo esc_html( webtier_rt_format( $webtier_rt_minutes ) ); ?></span>
</p>
Why the variables are prefixed: render.php runs in the global scope, so $label could collide with another plugin's variable. Plugin Check warns about unprefixed globals here. get_block_wrapper_attributes() is the PHP equivalent of useBlockProps(), and it outputs the colour and spacing classes from supports.
Step 5: Styles
style.scss loads in the editor and on the front end. editor.scss loads in the editor only:
/* src/reading-time/style.scss */
.wp-block-webtier-reading-time {
	display: flex;
	flex-wrap: wrap;
	align-items: center;
	gap: 0.4em;
}
/* src/reading-time/editor.scss */
.wp-block-webtier-reading-time {
	outline: 1px dashed currentColor;
	outline-offset: 4px;
}
Step 6: Register the block in PHP
Add these two functions to webtier-reading-time.php:
/**
 * Registers every block found in the build folder.
 */
function webtier_rt_register_blocks() {
	wp_register_block_types_from_metadata_collection(
		WEBTIER_RT_PATH . 'build',
		WEBTIER_RT_PATH . 'build/blocks-manifest.php'
	);
}
add_action( 'init', 'webtier_rt_register_blocks' );

/**
 * Passes the words-per-minute setting to the block editor script.
 */
function webtier_rt_editor_data() {
	wp_add_inline_script(
		'webtier-reading-time-editor-script',
		'window.webtierReadingTime = ' . wp_json_encode( array( 'wpm' => webtier_rt_get_wpm() ) ) . ';',
		'before'
	);
}
add_action( 'enqueue_block_editor_assets', 'webtier_rt_editor_data' );
wp_register_block_types_from_metadata_collection()(WordPress 6.8+) reads the generated manifest and registers all your blocks without parsing eachblock.jsonon every request. It's why our header saysRequires at least: 6.8. If you need to support older versions, callregister_block_type( WEBTIER_RT_PATH . 'build/reading-time' )instead.- The editor script's handle is generated from the block name:
webtier/reading-timebecomeswebtier-reading-time-editor-script. We attach a small inline script to it so the editor preview uses the same words-per-minute value as the PHP.
Step 7: Build and test
npm run start   # development: watches files and rebuilds on save
npm run build   # production: minified files in build/
Open a post, click the + inserter and search for "reading":
Also Read: Stateless Functional Components in React - JavaScript
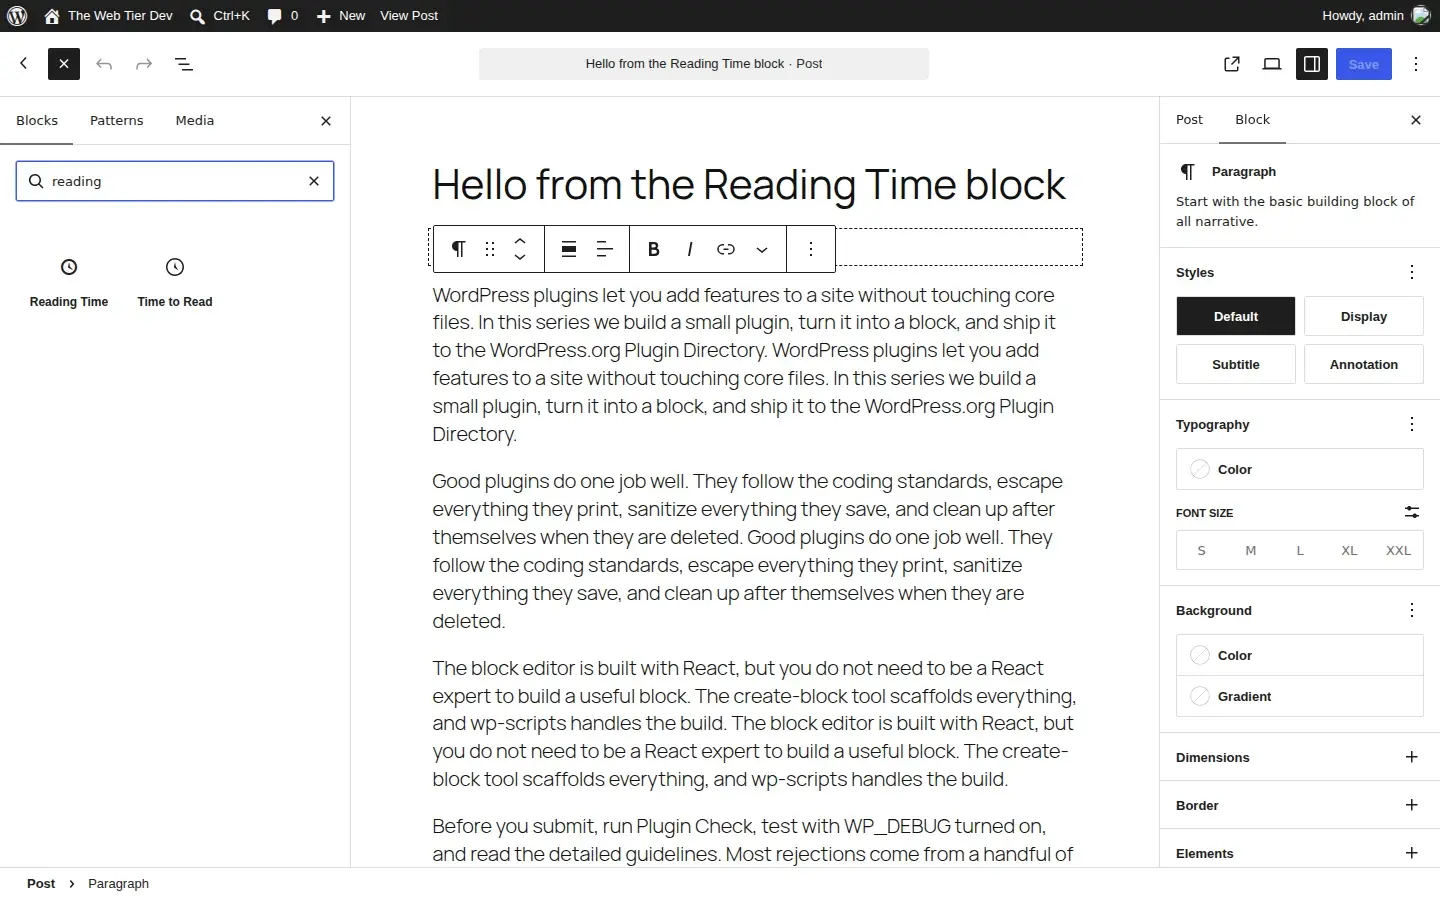
You'll notice Time to Read next to ours. WordPress core ships its own reading-time block. Ours adds a shortcode, a configurable speed and a label, but it's a good reminder to check core before building a feature.
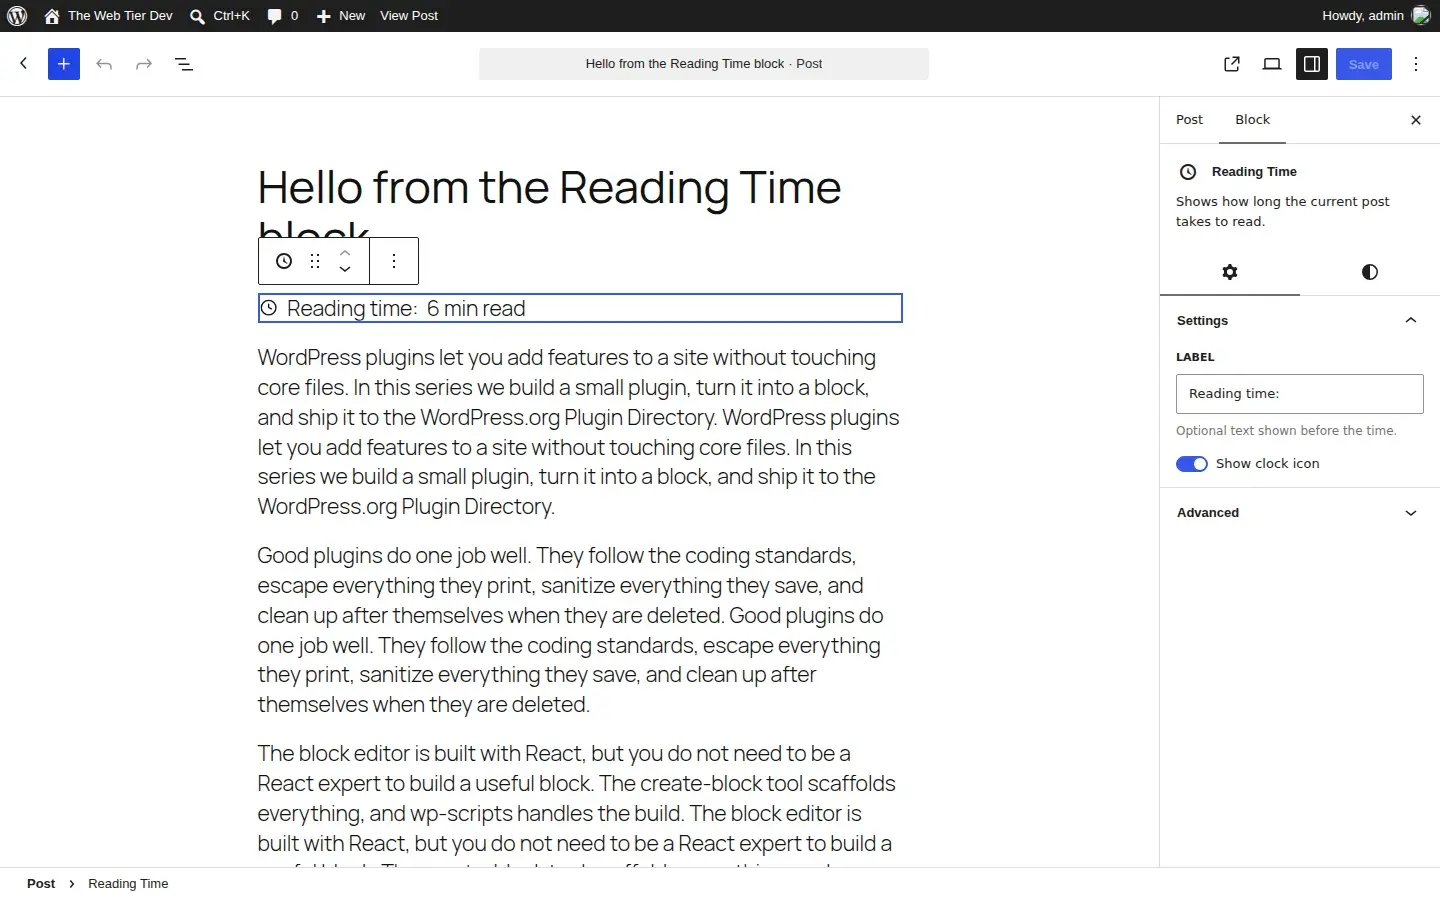
Insert the block, set a label, try the colour and font size controls, and view the post:
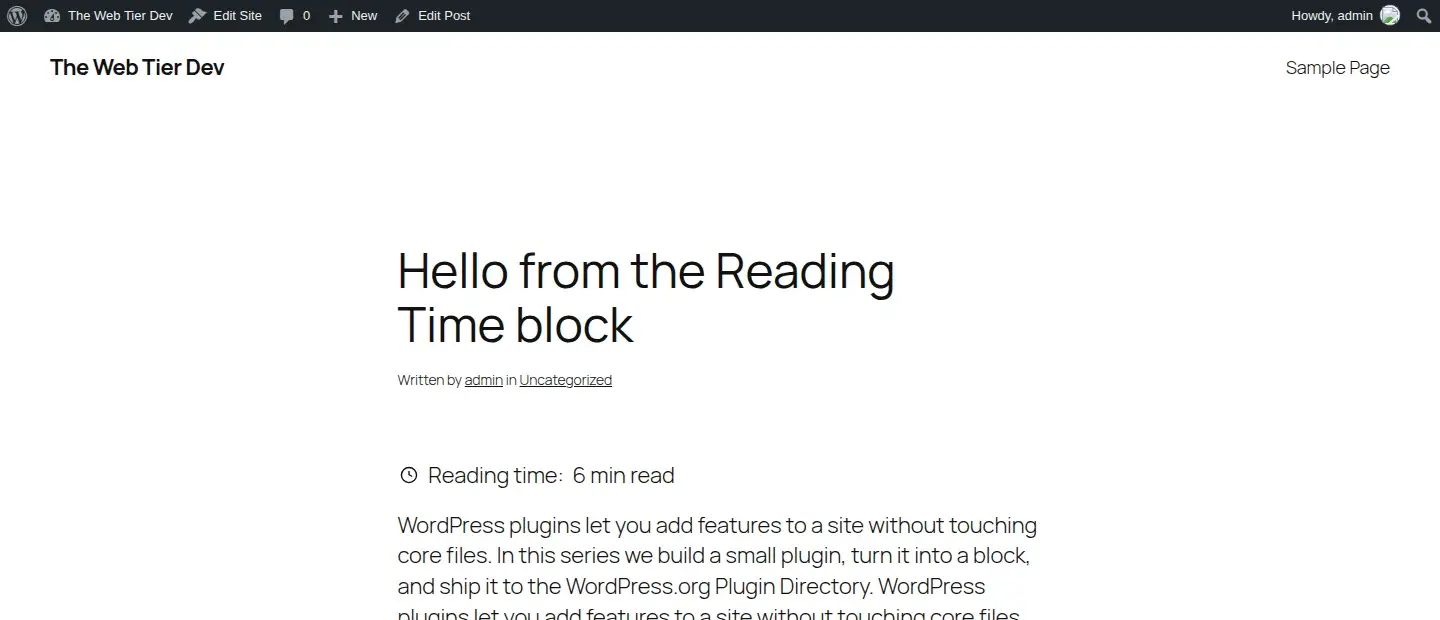
Test it inside a Query Loop on your blog index too. Each post should show its own reading time, thanks to usesContext.
Going further
- Interactivity API. For blocks that need front-end interactivity (tabs, filters, "load more"), use
npx @wordpress/create-block@latest my-block --template @wordpress/create-block-interactive-template. It generates aview.jsscript module using the Interactivity API. - PHP-only blocks (WordPress 7.0+). A very simple block can be registered with
register_block_type(),'supports' => array( 'autoRegister' => true )and arender_callback, with no JavaScript build at all. Attributes are limited to simple types. See the dev note. - Block variations, styles and patterns let you offer preset versions of blocks without new code.
Troubleshooting
| Problem | Likely cause |
|---|---|
| Block doesn't appear in the inserter | npm run build hasn't run, or build/blocks-manifest.php is missing. |
| "Your site doesn't include support for this block" | The plugin is inactive, or the name in block.json changed. |
| Styles missing in the editor | CSS enqueued on the admin page instead of via block.json. Remember the editor is iframed. |
| Editor preview shows 1 minute for everything | Check usesContext and that postId/postType exist. Templates in the Site Editor have no post. |
FAQ
Do I have to use React to build a Gutenberg block?
For the editor UI, yes, but you'll mostly use ready-made components from @wordpress/components. For very simple server-rendered blocks, WordPress 7.0's PHP-only blocks need no React at all.
Can one plugin register multiple blocks?
Yes. Add another folder under src/ with its own block.json. --blocks-manifest and wp_register_block_types_from_metadata_collection() pick up every block in build/ automatically.
Should I commit the build folder?
Not to Git. Build it during release. But the zip you submit to WordPress.org must include build/, because the directory won't run npm for you. We cover packaging in Part 5.
Next up
In Part 5: How to Prepare Your Plugin for the WordPress.org Directory we write a proper readme.txt, run Plugin Check, fix what it finds, check coding standards, and build a clean release zip.