How to Publish a Shopify App to the App Store
This is the last part of the series. TWT Product Badges is built, billed (part 6) and deployed (part 7). Now we'll get it onto the Shopify App Store.
Also Read: Introducing FilaRank: Filament's SEO Toolkit
Review is where many first-time developers lose weeks. Most rejections come from a short list of avoidable mistakes, so this post goes through them one by one.
Series: Shopify App Development 2026, part 8 of 8
Where publishing happens
- Dev Dashboard: set your app's distribution method to Public (on the app's home page, in the Distribution card). This can't be changed later (select distribution).
- Partner Dashboard: everything to do with the listing: the App Store listing, pricing, protected customer data requests, the App Store review page and submission.
Step 1: Complete the prerequisites
Work through these before you open the submission form:
- App Store registration paid ($19 one-time, Partner Dashboard → Settings)
- Emergency developer contact (email and phone) added. It's required and must be kept current
- API contact email that doesn't contain "shopify"
- App icon: 1200 × 1200 px, JPEG or PNG
- Compliance webhooks subscribed and returning 401 on invalid HMAC (part 4)
- Protected customer data access requested, if you use customer data (see below). You can't request it while the app is under review
- Privacy policy URL
- Demo screencast in English (or subtitled) showing setup and the core features
- Test instructions and credentials that give reviewers full access, including any paid features
- Billing uses real charges, with no hard-coded
test: true - Allowlist [email protected] so review emails don't land in spam
The official list is in submit your app for review.
Also Read: Programming Guide
Step 2: Check the requirements reviewers test
Shopify's App Store requirements are numbered. These are the ones that catch most apps:
| # | Requirement | How our template handles it |
|---|---|---|
| 1.1.1 | Use session tokens. Embedded apps must work without third-party cookies or local storage | ✅ App Bridge + authenticate.admin |
| 1.2.1–1.2.3 | Shopify billing only, correct approve and decline flows, self-serve upgrades and downgrades | ✅ Shopify App Pricing (part 6) |
| 2.2.3 | Use the latest App Bridge (the app-bridge.js script before other scripts) | ✅ <AppProvider> injects it |
| 2.2.4 | New public apps must use GraphQL Admin API only | ✅ No REST calls |
| 2.3.1–2.3.4 | Install only from Shopify surfaces, authenticate immediately after install, then land in the app UI; require auth again on reinstall | ✅ Managed installation |
| 4.1.1–4.1.2 | App name matches the Dev Dashboard and is unique | Check it |
| 5.1.1 | Online Store apps must use theme app extensions, not edit theme code | ✅ Our app block (part 5) |
| Checklist | Don't reduce storefront Lighthouse scores by more than 10 points | Keep block CSS and JS tiny |
| Checklist | No APIs deprecated in the last 90 days | Use API 2026-07 or newer |
Protected customer data
If your app reads customer information (orders, customers and so on), you must request protected customer data access in the Partner Dashboard (API access requests) before submitting (docs):
- Level 1: customer data without name, address, phone or email. There are 9 requirements, including data minimisation, telling merchants what you process and why, respecting consent, retention periods, and encryption at rest and in transit.
- Level 2: adds name, address, phone and email, requested field by field, plus 7 more requirements such as encrypted backups, separate test and production data, limited staff access, access logging and an incident response policy.
Our badge app only touches products, so it doesn't need this. Most CRM, email and review apps do.
Step 3: Write an App Store listing that ranks
Your listing is a landing page and a search result at the same time. Here are the 2026 specs (listing best practices):
Also Read: SEO: Moving Apache Redirect
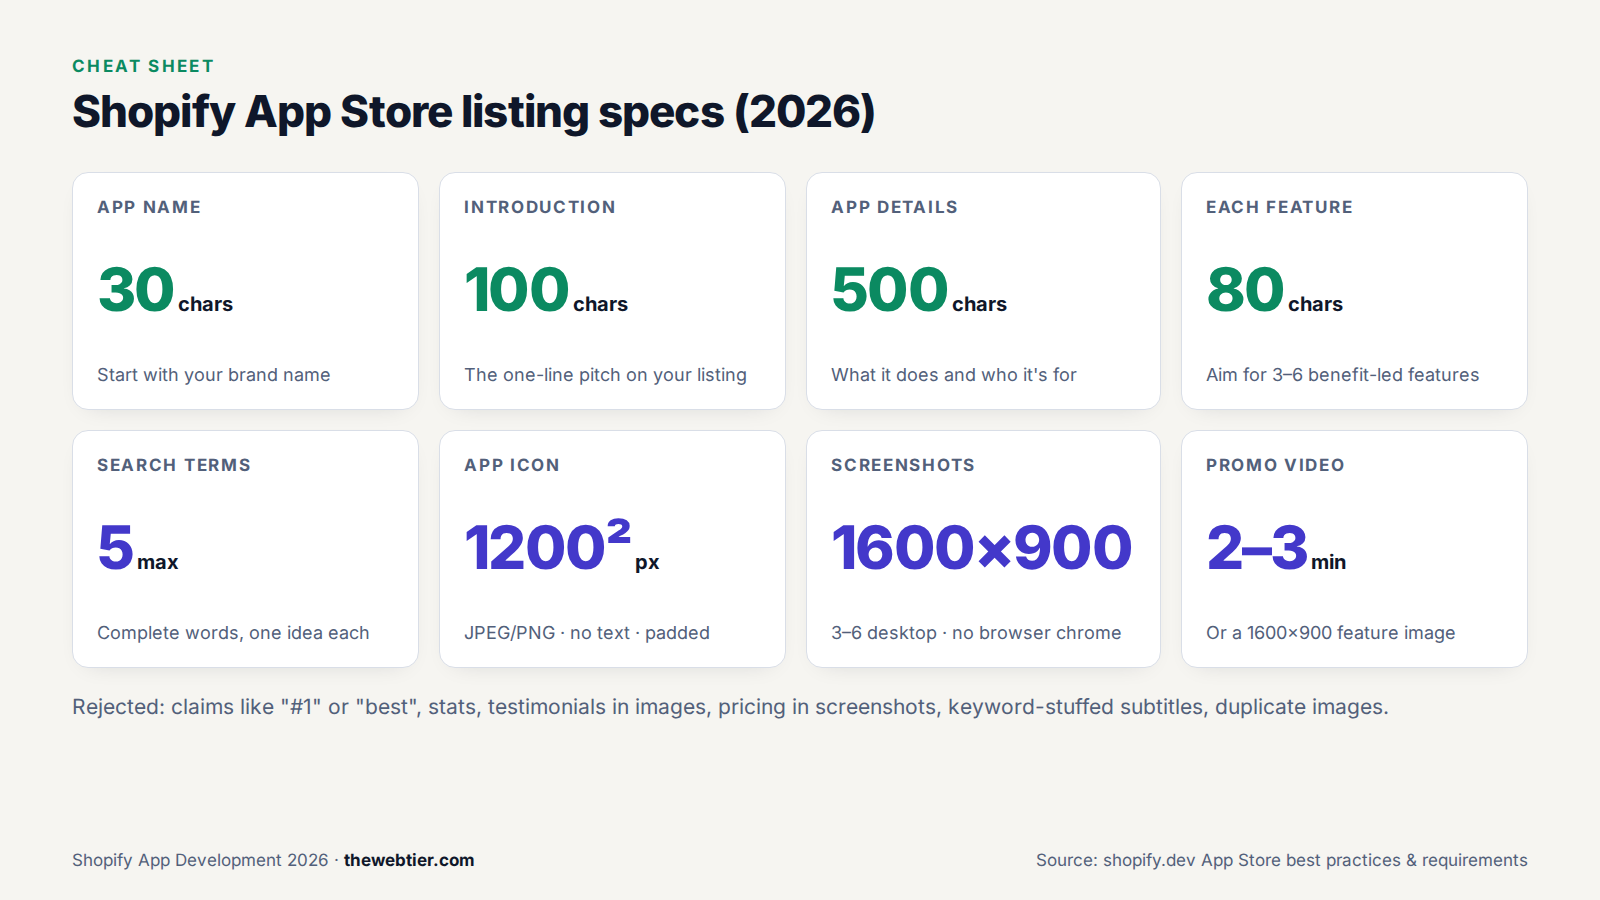
| Field | Limit / spec |
|---|---|
| App name | 30 characters, starting with your brand |
| App introduction | 100 characters |
| App details | 500 characters |
| Feature list | Up to 80 characters per feature (aim for 3–6) |
| Search terms | Up to 5, complete words, one idea each |
| App icon | 1200 × 1200 px, no text, padding around the logo |
| Screenshots | 1600 × 900 px (16:9), 3–6 desktop screenshots, with alt text |
| Feature media | A 1600 × 900 image, or a 2–3 minute promo video |
| Integrations | Up to 6 |
Listing SEO rules (and what gets you rejected)
- Lead with the benefit, not the tech. Merchants search for the problem they have: "product badges", "sale labels", "sticker".
- Use keywords naturally. A keyword-stuffed subtitle breaks requirement 4.4.1.
- No unprovable claims or stats. "The #1 badge app" or "boost sales 300%" breaks 4.3.x. So do reviews and testimonials inside images or text.
- No pricing in screenshots or the icon. Pricing goes only in the pricing section (4.2.x).
- Clean screenshots. Show your app UI with no browser chrome, no personal data, and no duplicate images (4.4.4–4.4.5).
- Pick accurate categories and tags. Wrong tags are a listing violation, and they also rank you for the wrong searches.
- Track your traffic. Add a GA4 measurement ID or Meta Pixel in the listing's tracking settings. You'll see events like
view_item,add_to_cart(Install clicked) andshopify_app_install(listing traffic tracking).
Example: our listing
App name: TWT Product Badges (18/30)
Introduction: Add New, Sale and Bestseller badges to any product and show them on your storefront. (84/100)
Features:
- Add a custom badge to any product from one simple table (55/80)
- Show badges on product pages with a theme app block (51/80)
- Match your brand with custom badge and text colours (51/80)
- Works with every Online Store 2.0 theme, no code needed (55/80)
Search terms: product badges · sale labels · product stickers · new arrival badge · bestseller label
Write it in the Partner Dashboard under your app's Distribution → Manage listing.
Step 4: Run the pre-submission checks
- Automated checks. The App Store review page in the dashboard runs automated tests against your app, covering things like the install and auth flow and compliance webhooks. They must pass before the Submit button unlocks.
- AI self-review (new). Install Shopify's AI Toolkit and run
/shopify-app-store-reviewin your coding agent (Claude Code, Cursor, VS Code and others). It reads the requirements, inspects your project, and reports what's likely to pass, likely to fail, or needs a manual check. It only covers requirements that can be checked in code, so still go through your listing by hand (pass app review). - A fresh-eyes install. Install your production app on a brand-new dev store, go through onboarding as a merchant would, upgrade a plan, uninstall and reinstall. Reviewers do exactly this.
Step 5: Submit, and what happens next
Also Read: Why Slack and iMessage show Content the wrong title for your post
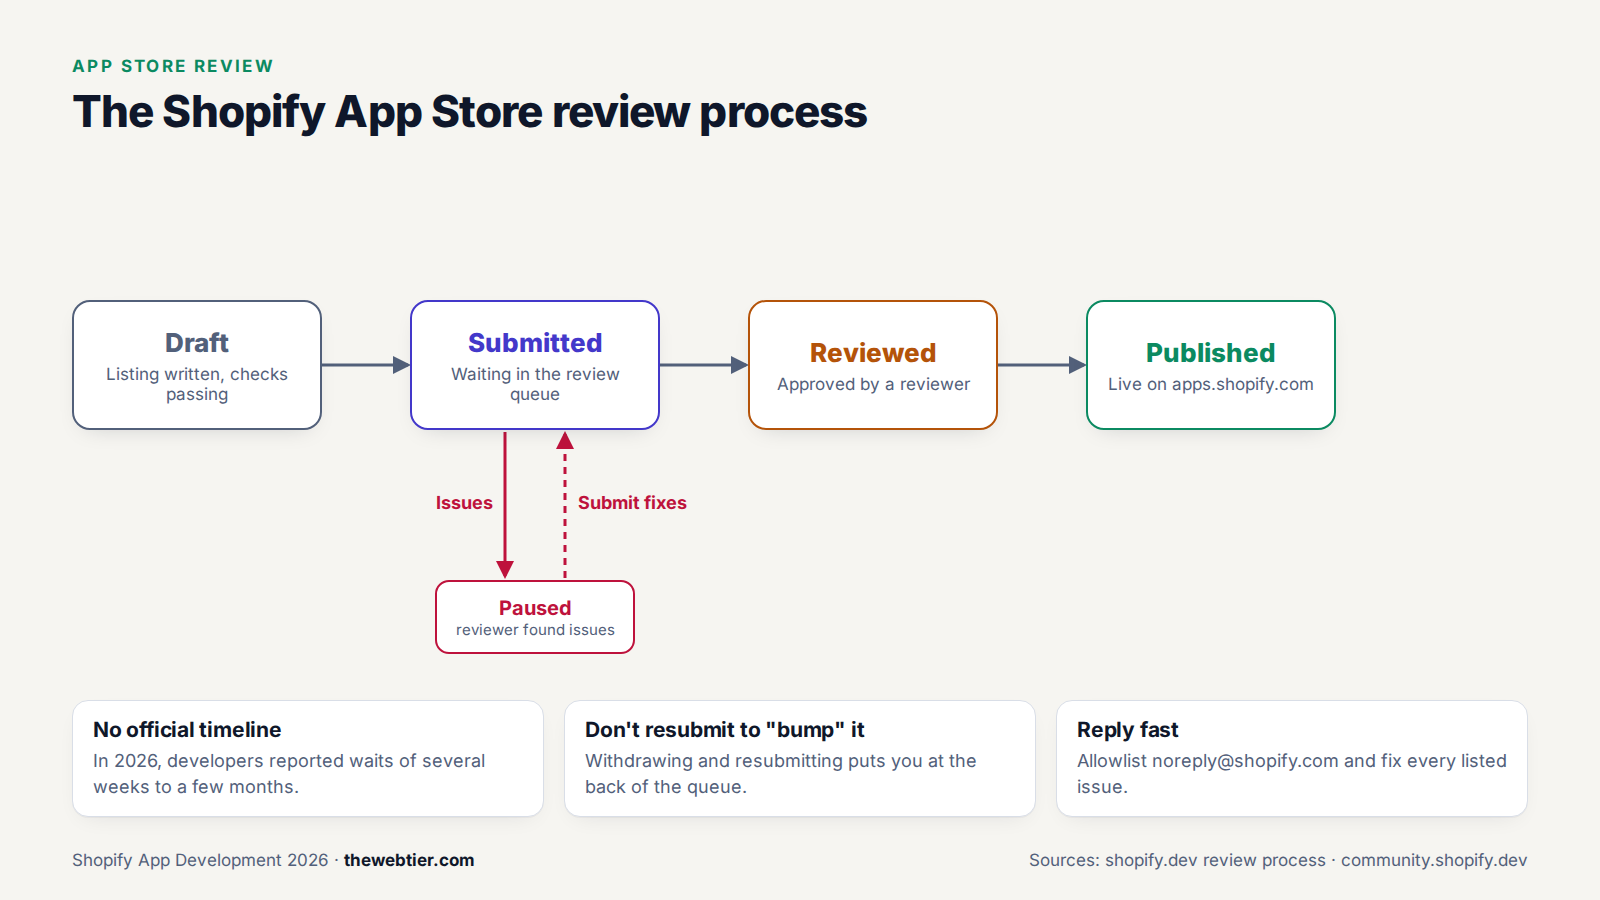
Your app moves through Draft → Submitted → Reviewed (or Paused) → Published (review process). If a reviewer finds issues, the review is paused. Fix everything they listed, then click Submit fixes.
How long does Shopify app review take?
Shopify doesn't publish an official time. In February 2026 Shopify staff said review times were longer than usual because of a big jump in submissions, and developers in that forum thread reported waits of one to four months, longer when an app needed several rounds of fixes (Shopify staff post). Two tips:
- Don't withdraw and resubmit to "bump" your app. It puts you at the back of the queue.
- Reply quickly to reviewer emails. Going quiet, or resubmitting with new problems, can lead to a temporary suspension.
The most common rejection reasons
Mostly from Shopify's own list (pass app review):
- Billing problems: not using Shopify billing, no way to switch plans, pricing that doesn't match the listing, or
test: trueleft on - Install flow: not going straight to the OAuth or grant screen, or errors right after install
- Embedding: switching between embedded and non-embedded modes, or not using App Bridge and session tokens consistently
- UI bugs: 404 and 500 errors, broken pages, empty states that don't guide the merchant
- Bad test credentials or an unfinished app
- Storefront apps not using theme app extensions, or blocks that throw errors
- Listing violations: claims, stats, testimonials, pricing in images, keyword stuffing, duplicate screenshots
After launch: grow the app
Aim for Built for Shopify
Built for Shopify (BfS) is Shopify's quality badge. It brings a search ranking boost, eligibility for featured placements, plan-based ad targeting, and priority review for future submissions (Built for Shopify).
To qualify you need:
- At least 50 net installs from active shops on paid plans, at least 5 reviews, and a good recent rating
- Admin performance at the 75th percentile over 28 days: LCP ≤ 2.5 s, CLS ≤ 0.1, INP ≤ 200 ms
- Storefront impact under 10 Lighthouse points. Checkout extensions need p95 ≤ 500 ms and a failure rate of 0.1% or less
- Design and integration: Polaris patterns,
s-app-nav, the contextual save bar for forms, theme app extensions, useful reporting on the app home page, and no pressure tactics or auto-opening modals
BfS status is reviewed every year. The Dev Dashboard now shows your admin Web Vitals against the BfS thresholds, and your overall eligibility is on the app's Distribution page in the Partner Dashboard. Build to these standards from day one rather than retrofitting.
Also Read: SEO: Disallow before User-agent:
Reviews, the right way
Merchants can review your app while it's installed and for 45 days after uninstalling. You can link straight to the review form with https://apps.shopify.com/your-app#modal-show=WriteReviewModal. Don't offer incentives, ask only for positive reviews, send unsolicited review emails, or ask during onboarding. Shopify tightened enforcement in July 2026 (review guidelines).
Other growth levers
- Shopify App Store Ads: pay-per-click ads in search, category pages and the homepage (advertising)
- Analytics: installs, uninstalls, time to uninstall and revenue in the Partner Dashboard; logs and App Events in the Dev Dashboard
- Content marketing: tutorials and comparison posts on your own blog, like this one
- Partner referrals: earn when merchants you refer sign up for Shopify (part 2)
Series recap: from idea to App Store
- Shopify App Development in 2026: The Complete Roadmap
- How to Become a Shopify App Developer
- Build Your First Shopify App with Shopify CLI
- Shopify GraphQL Admin API, Metafields and Webhooks
- Shopify App Extensions Explained
- How to Monetise a Shopify App
- How to Deploy a Shopify App to Production
- How to Publish a Shopify App to the App Store (you are here)
FAQ
How much does it cost to publish a Shopify app?
A one-time $19 App Store registration fee. After that, Shopify takes 0% of your first $1M in lifetime app revenue, then 15%, plus a 2.9% processing fee on app billing.
Can I publish a free Shopify app?
Yes. Free apps go through the same review. You still need compliance webhooks, a privacy policy and a complete listing.
Also Read: UTM parameters that do not split your reports into twelve campaigns
Why was my Shopify app rejected?
The usual causes are billing mistakes (including test: true), a broken install or auth flow, not using App Bridge and session tokens consistently, UI errors, bad test credentials, and listing violations. Fix everything in the reviewer's email before you click Submit fixes.
Do I need Built for Shopify to succeed?
No, but it helps a lot with ranking and trust. You can't apply until you have 50 net paid installs and 5 reviews, so focus on a solid app and happy early merchants first.
Thanks for following the series! If you build something with it, tell us in the comments. And if Shopify changes something (it will), we'll keep these posts updated.