In part 2 we built the PHP side of our Reading Time addon: a modifier, a tag and a settings page. Those help people reading the site. Now we'll help the people writing it.
Also Read: JavaScript: How to make
We're going to build a Statamic custom fieldtype: a textarea that shows editors a live word count and reading time as they type, with an optional warning when a piece runs past a target length.
This is also where Statamic 6 differs most from earlier versions. The Control Panel now runs on Vue 3, fieldtypes use a composable rather than a mixin, and Statamic ships its own UI component library. If you've built fieldtypes for v3 to v5, don't copy your old code across.
📸 SCREENSHOT TO ADD ·
03-fieldtype-in-entry.pngAn entry's publish form with the Reading Time Textarea filled in, showing "312 words · about 2 min read" under it.
Alt text: "A custom Statamic 6 fieldtype showing a live word count and reading time under a textarea"
How fieldtypes work
Every fieldtype has two halves:
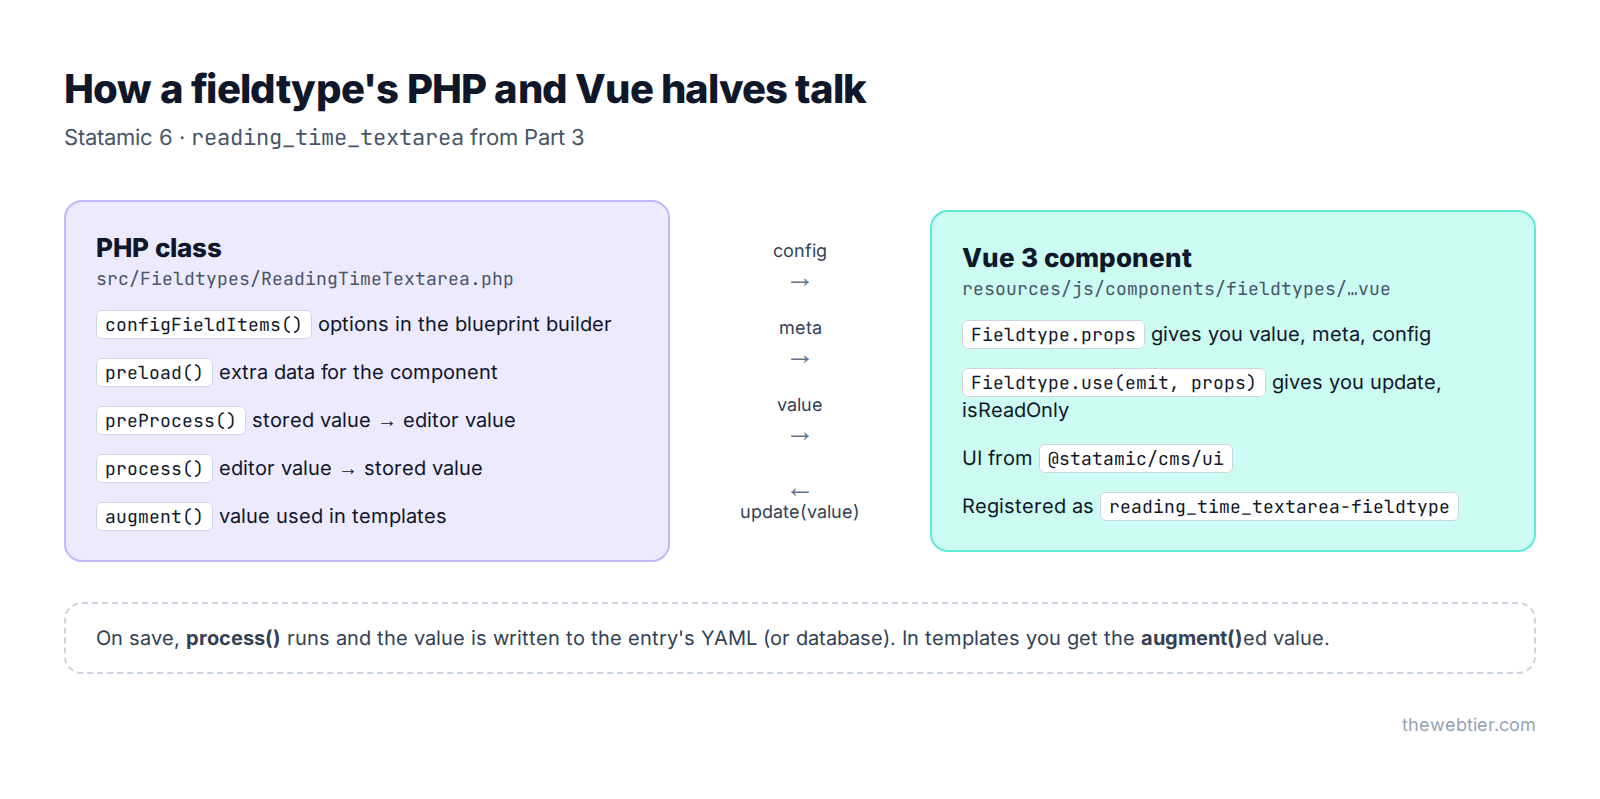
- A PHP class that controls config options, preloaded data, and how values are processed on save and augmented for templates.
- A Vue component that renders the input in the Control Panel.
They talk to each other like this:
Also Read: JavaScript and Jobs
Step 1: Generate the fieldtype
From your site's root, pass the addon's package name as the second argument:
php please make:fieldtype ReadingTimeTextarea thewebtier/reading-time
If this is the first Vue component in the addon, the command also sets up Vite for you. It:
- creates
src/Fieldtypes/ReadingTimeTextarea.php - creates
resources/js/components/fieldtypes/ReadingTimeTextarea.vue - adds
vite.config.js,package.jsonandresources/js/addon.jsto the addon - creates
resources/dist - adds a
$viteproperty to your service provider - publishes Statamic's dev build of the Control Panel (
--tag=statamic-cp-dev)
Pass --php if you only want the PHP class. That's useful for fieldtypes that reuse an existing Vue component.
Step 2: The PHP class
Statamic registers anything in src/Fieldtypes automatically. The handle is the snake-cased class name, reading_time_textarea. Here's the finished class:
<?php

namespace TheWebTier\ReadingTime\Fieldtypes;

use Statamic\Fields\Fieldtype;
use TheWebTier\ReadingTime\Support\ReadingTime;

class ReadingTimeTextarea extends Fieldtype
{
    protected $icon = 'text';

    public $categories = ['text'];

    protected $keywords = ['reading', 'words', 'counter', 'textarea'];

    protected function configFieldItems(): array
    {
        return [
            'target_minutes' => [
                'display' => __('Target reading time'),
                'instructions' => __('Show a warning when the text runs longer than this many minutes. Leave empty for no target.'),
                'type' => 'integer',
                'width' => 50,
            ],
        ];
    }

    /**
     * Data sent to the Vue component as `meta`.
     */
    public function preload()
    {
        return [
            'wordsPerMinute' => app(ReadingTime::class)->wordsPerMinute(),
        ];
    }
}
What each part does:
$icon,$categories,$keywordscontrol how the fieldtype appears in the blueprint builder's picker. Categories aretext,controls,media,number,relationship,structuredandspecial. The default isspecial.configFieldItems()adds options to the field's settings in the blueprint builder. Those values reach Vue asconfig.preload()sends extra data to the component asmeta. We pass the words-per-minute value from the addon settings we built in part 2, so the editor preview matches what the front end shows.
We store plain text, so we don't need preProcess() or process(). Implement them when the stored value and the editing value are different shapes. The classic example is storing IDs while showing labels.
📸 SCREENSHOT TO ADD ·
03-blueprint-fieldtype-picker.pngBlueprint builder → Add field, search "reading", showing "Reading Time Textarea" in the Text category.
Alt text: "Searching for a custom fieldtype in the Statamic 6 blueprint builder"
Step 3: The Vue 3 component
This is the generated stub. Every Statamic 6 fieldtype starts from this pattern:
<script setup>
import { Fieldtype } from '@statamic/cms';
import { Input } from '@statamic/cms/ui';

const emit = defineEmits(Fieldtype.emits);
const props = defineProps(Fieldtype.props);
const { expose, update } = Fieldtype.use(emit, props);
defineExpose(expose);
</script>

<template>
    <Input :model-value="value" @update:model-value="update" />
</template>
Fieldtype.propsgives youvalue,meta,config,handle,readOnlyand the rest.Fieldtype.emitsdeclares the events Statamic listens for.Fieldtype.use(emit, props)returns helpers:update(value),updateDebounced(value),updateMeta(meta),isReadOnly,defineReplicatorPreview(), field actions, andexpose, which you pass todefineExpose().
Here's our finished ReadingTimeTextarea.vue:
<script setup>
import { computed } from 'vue';
import { Fieldtype } from '@statamic/cms';
import { Textarea, Description } from '@statamic/cms/ui';

const emit = defineEmits(Fieldtype.emits);
const props = defineProps(Fieldtype.props);
const { expose, update, isReadOnly } = Fieldtype.use(emit, props);
defineExpose(expose);

const words = computed(() => {
  const text = (props.value || '').trim();
  return text === '' ? 0 : text.split(/\s+/).length;
});

const minutes = computed(() => {
  if (words.value === 0) return 0;
  return Math.max(1, Math.ceil(words.value / props.meta.wordsPerMinute));
});

const overTarget = computed(() => {
  const target = props.config.target_minutes;
  return target && minutes.value > target;
});
</script>

<template>
  <div>
    <Textarea :model-value="value" :read-only="isReadOnly" @update:model-value="update" />
    <Description >
      {{ words }} words · about {{ minutes }} min read
      <strong v-if="overTarget">— over the {{ config.target_minutes }} min target</strong>
    </Description>
  </div>
</template>
A few things worth pointing out:
- Use Statamic's UI components (
Textarea,Description) rather than your own HTML. They get dark mode, focus states and accessibility for free, and your field looks like it belongs in the Control Panel. That helps with guideline 04 (consistent design) and guideline 05 (keyboard use and visible focus). The full list is at ui.statamic.dev. - Respect
isReadOnly. Fields can be read-only because of permissions, revisions or thevisibilitysetting. Forgetting this is an easy way to fail review. - Call
update(), notemit('input'). That's the v6 way to change the value. UseupdateDebounced()for anything expensive.
📸 SCREENSHOT TO ADD ·
03-fieldtype-over-target-dark.pngThe same field in dark mode, with more text than the target, so the "over the target" warning is visible.
Alt text: "Statamic 6 custom fieldtype in dark mode showing an over-target reading time warning"
Step 4: Register the component
Open resources/js/addon.js:
import ReadingTimeTextarea from './components/fieldtypes/ReadingTimeTextarea.vue';

Statamic.booting(() => {
    // The name must be [snake_case_handle]-fieldtype
    Statamic.$components.register('reading_time_textarea-fieldtype', ReadingTimeTextarea);
});
The name matters. Statamic looks for a component called {handle}-fieldtype, so a PHP class called ReadingTimeTextarea must be registered as reading_time_textarea-fieldtype. If you get it wrong, the field simply doesn't render. It's the most common reason people get stuck here.
Step 5: Vite configuration
These are the files the generator created. package.json:
{
    "private": true,
    "type": "module",
    "scripts": {
        "dev": "vite",
        "build": "vite build"
    },
    "dependencies": {
        "@statamic/cms": "file:./vendor/statamic/cms/resources/dist-package"
    },
    "devDependencies": {
        "laravel-vite-plugin": "^2.0.0",
        "vite": "^7.0.4"
    }
}
Notice @statamic/cms isn't a real npm package. It points at vendor/statamic/cms inside your addon's folder. That's one reason make:addon runs composer install in the addon directory. If that vendor folder is missing, npm install fails.
Also Read: JavaScript: 13 Most Promising
vite.config.js:
import { defineConfig } from 'vite';
import laravel from 'laravel-vite-plugin';
import statamic from '@statamic/cms/vite-plugin';

export default defineConfig({
    plugins: [
        laravel({
            input: ['resources/js/addon.js'],
            publicDirectory: 'resources/dist',
        }),
        statamic(),
    ],
});
The statamic() plugin is what makes import { Fieldtype } from '@statamic/cms' work: it maps those imports to the Control Panel's own copy of Vue and its components. Don't bundle your own copy of Vue.
The service provider needs a matching $vite property (the generator adds it for you):
protected $vite = [
    'input' => ['resources/js/addon.js'],
    'publicDirectory' => 'resources/dist',
];
If you add a CSS entry to vite.config.js, add it here too.
Step 6: Run it
cd addons/thewebtier/reading-time
npm install
npm run dev
Keep the dev server running and open the Control Panel. If you see a "Vite manifest not found" error, the dev server isn't running, or you haven't built yet.
Also Read: Statamic Marketplace Submission PHP Guidelines + Review Skill
For hot reloading and Vue Devtools, publish Statamic's dev build once from your site's root:
php artisan vendor:publish --tag=statamic-cp-dev
It's only used while APP_DEBUG=true. Don't commit it or deploy it.
Now add the field to a blueprint: Collections → Blog → Blueprints → Add field → Reading Time Textarea. Set Target reading time to 5, open an entry, and start typing.
Step 7: Build for production
Customers don't run npm for your addon. They get whatever is in resources/dist. Before every release:
npm run build
Then commit resources/dist. Statamic publishes it to public/vendor/reading-time/build when the addon is installed, because vendor:publish runs after statamic:install.
Also Read: Build Your First Shopify App with Shopify CLI (2026) - Web Development
To check a production build locally, stop the dev server and run php artisan vendor:publish, then choose your addon's tag. If the fieldtype still works with no dev server running, your build is good.
⚠️ Forgetting to rebuild
resources/distbefore tagging is one of the most common reasons an addon works on the author's machine and breaks for customers. Guideline 06 ("ship an installable, compatible release") is where this gets caught. Part 7 includes a pre-release checklist.
Tailwind in addon components
If you want Tailwind classes in your own components:
npm install tailwindcss @tailwindcss/vite
Add tailwindcss() to the Vite plugins, then in your addon's CSS:
@import "@statamic/cms/tailwind.css";
Statamic puts addon CSS in a lower cascade layer (addon-utilities) than its own styles, so your classes can't accidentally break the Control Panel. Use Tailwind's ! prefix to override a core style only when you really need to.
Beyond fieldtypes: CP pages with Inertia
Fieldtypes, widgets and actions cover most addons. If you need a full Control Panel screen, like a reports page or an import tool, Statamic 6 recommends a Vue page rendered through Inertia. Register pages with Statamic.$inertia.register() in addon.js and return them from your CP controller. Use Statamic.configuring() if you need to install a Vue plugin before the Control Panel mounts.
FAQ
Why is my custom fieldtype showing a blank space?
Nearly always the component name. It must be {snake_case_handle}-fieldtype, registered inside Statamic.booting(). Also check the Vite dev server is running, or that resources/dist is built and published.
Also Read: Shopify App Development in 2026: The Complete Roadmap
Can I still use the Vue 2 mixin?
No. Statamic 6 runs Vue 3. There's a Fieldtype.mixin for components written with the Options API, but new code should use <script setup> and Fieldtype.use(). The Vue 2 to 3 upgrade guide covers migration.
Do I have to use Statamic's UI components?
No, but you should. They match the Control Panel's design, handle dark mode and are built for accessibility. Hand-rolled inputs tend to look out of place, and reviewers notice.
Should I commit resources/dist to Git?
Yes, for the usual setup. Customers install from Packagist and never run your build, so the compiled assets must be in the tagged release.
Further reading
- Build a Fieldtype (Statamic 6 docs)
- Vite Tooling for addons
- Statamic UI components
- Vue 3 Composition API
Previous: ← Part 2: Build a Statamic Addon · Next: Part 4: Testing and Documenting Your Addon →