Introduction
Your plugin works, it's tested, and it looks right in light and dark mode. Now it needs users. For a Filament plugin, that means two separate launches:
- Publishing the package so Composer can install it (Packagist, for free plugins)
- Listing it in the official Filament plugin directory, where most Filament developers go looking for plugins
The second one is also how you become a recognized Filament author, with a profile page listing everything you've built.
Also Read: Best Filament Themes and Starter Kits for 2026 (v5-Ready)
This part walks through both, using Filament Announcements from Parts 2 to 5. It also covers what Filament's reviewers look for and how the directory's health score is calculated.
Step 1: The Pre-Release Checklist
Before you tag anything, go through the repository as if you were a stranger deciding whether to trust it:
composer.jsonhas a realdescription,keywords(the skeleton addsfilament,filament-pluginandlaravel),homepage,supportlinks and your real name inauthors.composer validate --strictpasses.- No placeholders remain. Search for
[email protected],:vendor,Skeletonand "This is where your description should go". .github/SECURITY.mdhas a real contact address for vulnerability reports.LICENSE.mdmatches thelicensefield (the skeleton uses MIT).CHANGELOG.mdexists. The skeleton's workflow fills it from your GitHub release notes.- CI is green on the full matrix from Part 5.
composer.lockis ignored.- Screenshots of the plugin, in light and dark mode, are committed to an
art/folder (the skeleton's.gitattributesalready excludesart/from the downloaded package).
Step 2: Write a README the Directory Can Use
Your plugin's page on filamentphp.com shows your README as its documentation. That makes the README your landing page, so it's worth getting right. Filament's reviewers keep a set of standard responses for common problems, and several of them are about READMEs:
- Use absolute image URLs. Relative paths like
art/banners.jpgwork on GitHub but can't be embedded on filamentphp.com. Usehttps://raw.githubusercontent.com/vendor/repo/main/art/banners.jpg. - Hide duplicate images. Your plugin page already shows your cover image. If your README starts with the same image, add
class="filament-hidden"to it. It still shows on GitHub, but it's hidden on the Filament site:
<img src=https://raw.githubusercontent.com/thewebtier/filament-announcements/main/art/cover.jpg alt="Filament Announcements" />
- Embed videos as raw HTML. Use a
<video controls>tag with a raw video URL, not a GitHub attachment link. - Spell "Filament" correctly. Reviewers do ask authors to fix "filament" and "FilamentPHP" casing.
- Make the purpose obvious. "Plugin purpose unclear" is the first scenario in the guidelines. Open with one or two sentences saying what it does and who it's for, then show a screenshot.
A structure that works well:
- Name, badges, and a one-paragraph pitch
- A feature list and a screenshot
- Requirements (PHP, Laravel, Filament versions)
- Installation:
composer require, publishing migrations,php artisan filament:assets - Usage: registering the plugin, then every configuration method with an example
- Translations and customization
- Testing, changelog, contributing, security, credits, license
The finished Filament Announcements README follows exactly this structure, so you can use it as a template.
Step 3: Version with Semantic Versioning
Composer reads versions from your Git tags, not from composer.json. Follow Semantic Versioning:
- Patch (
1.0.1): bug fixes only - Minor (
1.1.0): new features, backwards compatible - Major (
2.0.0): breaking changes, such as dropping a Filament or Laravel version, renaming config methods or changing the database schema without a migration path
Many Filament plugins line their major versions up with Filament's (3.x for Filament v3, 4.x for v4), or keep a support table in the README. Either works, as long as users can tell which version to install.
Also Read: Laravel and PHP
Tag and push:
git tag v1.0.0
git push origin v1.0.0
Then create a GitHub release from the tag with human-readable notes. The skeleton's update-changelog.yml workflow copies those notes into CHANGELOG.md for you.
Step 4: Publish on Packagist
For a free plugin, Packagist is where Composer finds your package:
- Sign in to Packagist, ideally with GitHub.
- Click Submit and paste your repository URL.
- Packagist reads your
composer.jsonand tags, and your package is live asthewebtier/filament-announcements.
Two things to know:
- Enable auto-updates. According to Packagist's docs, if you sign in with GitHub and grant the Packagist app access to your organization, new tags are picked up automatically. Otherwise, add a GitHub webhook pointing at
https://packagist.org/api/github?username=YOUR_USERNAME, using your Packagist API token as the secret. - Your vendor name is now protected. Once a package is published under
thewebtier/, nobody else can publish under that vendor.
Test the real install in a fresh app before you announce anything:
composer require thewebtier/filament-announcements
Paid plugins skip Packagist and go through a private Composer repository instead. That's covered in Part 7.
Step 5: Become a Filament Author
Filament used to take plugin submissions as pull requests of Markdown files against its website repository. That repository is now archived. In its own words, there's "a proper admin UI on the new Filament website that handles plugin submissions and updates. No more pull requests, no more Markdown files."
The process now looks like this:
- Go to filamentphp.com/author and sign in with GitHub.
- Request access to your author profile. If you published plugins under the old system, your profile and plugins were migrated, and you're claiming them. New authors set up a profile.
- Once the Filament team approves the request, the profile is linked to your account and you can submit new plugins, push updates to existing ones and manage everything from the dashboard.
Prepare your profile before you request access. Based on Filament's published review guidelines:
- A short bio. "Missing author bio" is one of the standard rejection reasons.
- An avatar with a 1:1 aspect ratio, at least 1000×1000 pixels, preferably JPEG.
- Your GitHub URL and any website you want linked.
Note: The author dashboard is only visible after you sign in, so the exact labels and screens may differ slightly from what's described here. The requirements come from Filament's published review guidelines and the fields every directory listing displays.
Step 6: Submit Your Plugin to the Directory
Every listing in the directory displays the same core information, so have it ready:
| What you'll need | For Filament Announcements |
|---|---|
| Plugin name | Announcements |
| Short description | Schedule dismissible announcement banners across your Filament panels. |
| GitHub repository | thewebtier/filament-announcements |
| Documentation (usually your README) | The README from Step 2 |
| Supported Filament versions | 5.x |
| Categories | Panel Builder, Widget |
| Dark mode ready? | Yes |
| Translations / multilingual? | Yes |
| Cover image | 16:9 JPEG, at least 2560×1440 |
| Support channel | Discord (Filament can create a channel per plugin) |
| Price (paid plugins) | Your Anystack or Privato product |
Categories. Pick the categories that describe what the plugin adds. When the directory ran on GitHub, the categories were: action, analytics, developer tool, form builder, form editor, form field, form layout, icon set, infolist entry, kit, panel authentication, panel authorization, panel builder, Spatie, table builder, table column, theme and widget. Choose from whatever the dashboard offers now. "Invalid category" is another standard rejection reason.
The cover image
This is the image people see first in the plugin grid, and reviewers are strict about it:
- 16:9 aspect ratio, at least 2560×1440 pixels, preferably JPEG
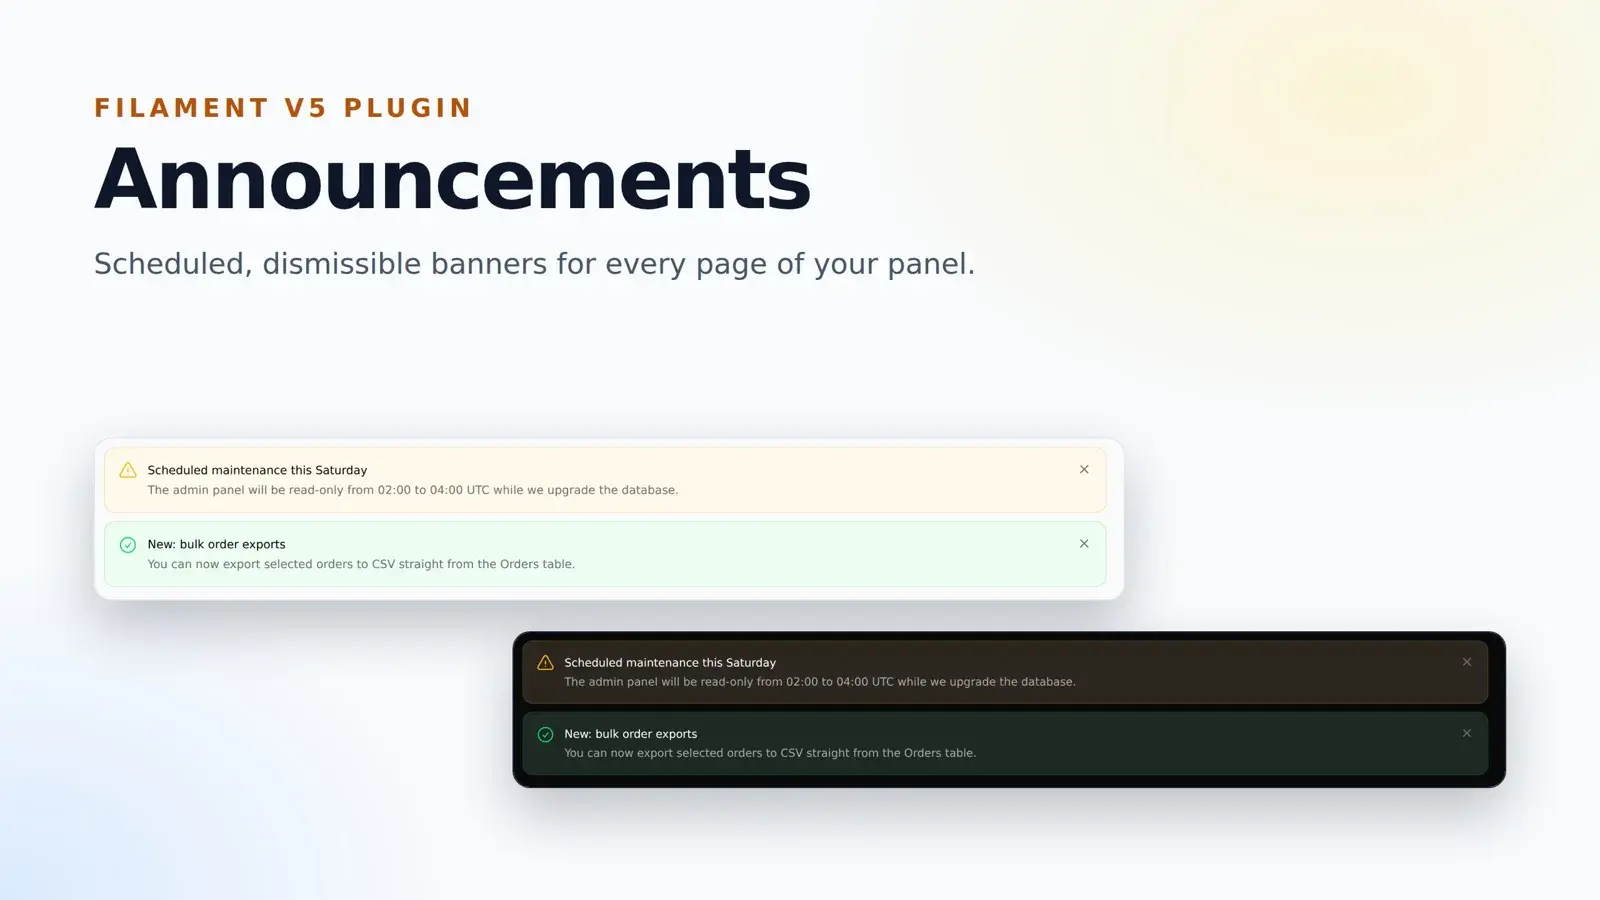
- Show the functionality, not your whole panel. Reviewers specifically ask authors to "zoom in to crop out the sidebar and top bar"
- Match the style of the directory. "Design doesn't align closely with the other plugins" is a real review response
Here's the cover we made for Filament Announcements. It uses the real banners, in light and dark mode, with no sidebar or top bar:
Also Read: Laravel: Create a LinkedIn
Not a designer? Filament's guidelines point to Beyond Code's banner generator as a quick way to make one.
Step 7: What Reviewers Look For
Filament's review guidelines list the situations reviewers respond to most often. Turned into a checklist, they're easy to pass:
- The purpose is clear from the documentation, ideally with screenshots.
- It's a Filament plugin, not a general Laravel package. If it would work without Filament, reviewers may suggest publishing it as a Laravel package instead.
- "Filament" is capitalized correctly everywhere.
- No duplicate images between the cover and the README (use
filament-hidden). - The cover image focuses on the feature, at the right size and ratio.
- README images use absolute URLs and videos use raw HTML.
- Your author profile has a bio and a correctly sized avatar.
- The categories are valid.
- The design is consistent with the rest of the directory.
- Paid plugins get a second review, where a team member looks at the private repository before approval.
The Health Score
Every plugin page shows a package health score out of 100, built from automated checks grouped into Security, Maintenance and Ecosystem. You can filter the directory by score (60+, 80+ or 100), so a low score costs you visibility.
Also Read: Get a LinkedIn OAuth PHP Access Token in Laravel (2026)
On a plugin with a perfect score, the checks shown are:
- GitHub Actions pinned to SHA
- Open security advisories
- Dependabot PR responsiveness
- Dependabot or Renovate configured
- Dependency update cooldown configured
- Provides a security policy
- Abandoned or archived
- Commit and release recency
composer.locknot committed by library- Dist archive is lean
- Current Laravel version supported
- Current PHP version supported
- Current Symfony version supported
- GitLab CI includes pinned to SHA (skipped for GitHub projects)
- Renovate MR responsiveness (skipped if you use Dependabot)
If you started from the skeleton and followed Part 5, you pass most of these on day one. The ones that need ongoing attention are merging Dependabot pull requests promptly, committing and releasing regularly, and widening your constraints when a new PHP or Laravel version ships.
Also note what the directory says on its own listing page: most plugins are third-party, and only "Official" plugins are vetted by the Filament team. Users are relying on your health score, tests and changelog to decide whether to trust you.
After You're Listed
- Answer support questions where you said you would. The guidelines mention per-plugin Discord channels, though they note these can be delayed when Discord's channel limit is reached.
- Keep supported versions accurate. When Filament ships a new major version, update your constraint, CI matrix and the versions listed on your plugin.
- Push updates from the dashboard, not just GitHub, when your listing details change.
- Write about it. A launch post, a short demo video and a post in the Filament community do more than any amount of SEO.
Key Takeaways
- Clean up placeholders, fix
SECURITY.md, ignorecomposer.lockand get CI green before your first tag. - Your README is your plugin's documentation page on filamentphp.com. Use absolute image URLs and
filament-hiddenfor duplicate images. - Tag semantic versions and publish free plugins on Packagist with GitHub auto-updates.
- Become an author at filamentphp.com/author by signing in with GitHub and requesting access to your profile. Submissions and updates are handled from there, not through pull requests.
- Covers must be 16:9, at least 2560×1440, focused on the feature. Avatars must be 1:1, at least 1000×1000.
- The health score rewards good repository hygiene, and the skeleton gets you most of the way.
In the final part, Part 7, we look at the other path: selling a premium Filament plugin, with licensing through Anystack or Privato, pricing, private Composer repositories and ongoing maintenance.
Also Read: Renew LinkedIn Access Tokens in Laravel (60-Day Fix)
FAQ
How do I submit a plugin to the Filament plugin directory?
Sign in with GitHub at filamentphp.com/author and request access to your author profile. Once the Filament team approves it, you can submit plugins and updates from the author dashboard. The old pull-request process has been retired.
What size should a Filament plugin cover image be?
Filament's review guidelines require a 16:9 image of at least 2560×1440 pixels, preferably a JPEG. It should highlight the plugin's functionality rather than show a full panel with the sidebar and top bar.
Do I need Packagist for a Filament plugin?
For a free, public plugin, yes. Packagist is how Composer finds it. Paid plugins are distributed through a private Composer repository provided by a licensing platform such as Anystack or Privato.
What is the Filament plugin health score?
It's an automated score out of 100 shown on each plugin's page, built from checks in three groups (security, maintenance and ecosystem), such as SHA-pinned GitHub Actions, a security policy, recent releases and support for current PHP and Laravel versions.