Laravel Telescope is an exquisite troubleshoot collaborator for the Laravel structure. Telescope gives knowledge into the solicitations coming into your application, exemptions, log sections, database questions, lined employments, mail, notices, reserve activities, planned errands, variable dumps and that's just the beginning. The telescope makes a brilliant friend to your nearby Laravel improvement condition.
Installation
Telescope requires Laravel 5.7.7+.You may use Composer to install Telescope into your Laravel project:
composer require laravel/telescope
After installing Telescope, publish its assets using the telescope: install Artisan command. After installing Telescope, you should also run the migrate command:
php artisan telescope:install
php artisan migrate
Updating Telescope
When updating Telescope, you should re-publish Telescope's assets:
php artisan telescope:publish
Installing Only In Specific Environments
If you plan to only use Telescope to assist your local development. You may install Telescope using the --dev flag:
composer require laravel/telescope --dev
After running telescope:install, you should remove the TelescopeServiceProvider service provider registration from your app configuration file. Instead, manually register the service provider in the register method of your AppServiceProvider:
use Laravel\Telescope\TelescopeServiceProvider;

/**
* Register any application services.
*
* @return void
*/
public function register()
{
 if ($this->app->isLocal()) {
 $this->app->register(TelescopeServiceProvider::class);
 }
}
Configuration
After publishing Telescope's assets, its primary configuration file will be located at config/telescope.php. This configuration file allows you to configure your watcher options and each configuration option includes a description of its purpose, so be sure to thoroughly explore this file.
If desired, you may disable Telescope's data collection entirely using the enabled configuration option:
'enabled' => env('TELESCOPE_ENABLED', true),Data Pruning
Without pruning, the telescope_entries table can accumulate records very quickly. To mitigate this, you should schedule the telescope:prune Artisan command to run daily:
$schedule->command('telescope:prune')->daily();By default, all entries older than 24 hours will be pruned. You may use the hour's option when calling the command to determine how long to retain Telescope data. For example, the following command will delete all records created over 48 hours ago:
$schedule->command('telescope:prune --hours=48')->daily();It has been years from now to work with the MongoDB. Back in the days, Java environment discovered Laravel which works together with PHP. It is a whole new different thinking and concept compared to the traditional relational database development while working with MongoDB. There are some libraries out to directly use the MongoDB PHP Library. The below given steps create a MongoDB Laravel access to the database.
Mongo::get()->mydatabase->mycollection;
Installing Laravel & MongoDB Database
Follow the Laravel installation guide and install MongoDB. On OS X I highly recommend to use Homebrew. In addition install Laravel Valet — a minimalistic development environment using Nginx and Dnsmasq. I don’t want to work without it anymore.
To test the successful MongoDB installation open the terminal, connect to MongoDB, create a database and collection and insert a document:
mongo
> use mydatabase
> db.mycollection.insert( { "hello": "world" } )
Create a new Project
Open the terminal, change to your Valet directory and type:
laravel new myproject
cd myproject
composer require mongodb/mongodb
This creates a new Laravel project and adds the MongoDB PHP Library to it.
To test the MongoDB connection open routes/web.php file and add:
<?php
use MongoDB\Client as Mongo;

Route::get('mongo', function(Request $request) {
 $collection = (new Mongo)->mydatabase->mycollection;
 return $collection->find()->toArray();
});
Route::get('/', function () {
 return view('welcome');
});
Service, ServiceProvider, Facade
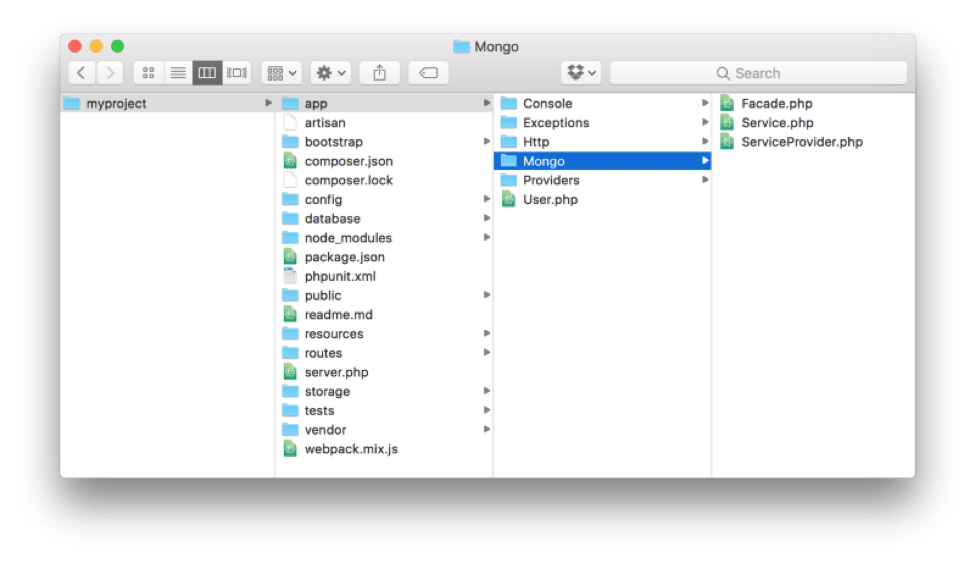
Create an app/Mongo directory, put the 3 files (Service, ServiceProvider, Facade) there, modify the configuration in config/app.php, config/services.php, and .env. There you go!
Service.php
<?php
namespace App\Mongo;
use MongoDB\Client;
class Service {
 private $mongo;
 public function __construct($uri, $uriOptions, $driverOptions) {
  $this->mongo = new Client($uri = null, $uriOptions = [],
  $driverOptions = []);
 }
 public function get() {
  return $this->mongo;
 }
}
ServiceProvider.php:
<?php
namespace App\Mongo;
class ServiceProvider extends \Illuminate\Support\ServiceProvider {
 protected $defer = true;
 public function register() {
  $this->app->singleton('mongo', function($app) {
  $config = $app->make('config');
  $uri = $config->get('services.mongo.uri');
  $uriOptions = $config->get('services.mongo.uriOptions');
  $driverOptions =
  $config->get('services.mongo.driverOptions');
  return new Service($uri, $uriOptions, $driverOptions);
  });
 }
 public function provides() {
  return ['mongo'];
 }
}
Facade.php:
<?php
namespace App\Mongo;
class Facade extends \Illuminate\Support\Facades\Facade {
 protected static function getFacadeAccessor() {
  return 'mongo';
 }
}
Then modify the configuration:
in config/app.php
/*
* Application Service Providers
*/
App\Mongo\ServiceProvider::class,
...
/*
* Class Aliases
*/
'Mongo' => App\Mongo\Facade::class,
in config/services.php
'mongo' => [
  'uri' => env('MONGO_URI'),
  'uriOptions' => env('MONGO_URI_OPTIONS'),
  'driverOptions' => env('MONGO_DRIVER_OPTIONS'),
],
in .env
MONGO_URI=
MONGO_URI_OPTIONS=
MONGO_DRIVER_OPTIONS=
Now let’s use the Mongo Facade in your application. Therefore just modify the routes/web.php from before:
<?php
Route::get('mongo', function(Request $request) {
 $collection = Mongo::get()->mydatabase->mycollection;
 return $collection->find()->toArray();
});
Route::get('/', function () {
 return view('welcome');
});
Exciting Times ahead
From the given post, we can have a full guide for implementing the Laravel telescope with the use of MongoDB. Happy Coding.

Leave a comment
Your email address will not be published. Email is optional. Required fields are marked *